Neapolitan pizza has long traditions, and even though poolish is not the most traditional way to make Neapolitan pizza, it doesn’t mean you can’t improve the flavor and make even better pizza. Poolish might not be a historically traditional method to make pizza in Naples, but it does make an amazingly flavorful pizza crust. And it’s also easy to make Neapolitan pizza with poolish!
Jump to the recipe summaryPoolish is a simple way to improve the flavor and consistency of your crust just by adding one simple step to your pizza-making process. So if you want better pizza, let’s get started on how to make Neapolitan pizza with poolish!

Why poolish makes better Neapolitan pizza
The main reason to use poolish in your pizza dough is to improve the flavor and consistency of the crust. Using poolish is an easy way to get a dough that feels and tastes like a long and slow-fermented dough in a shorter time. This is accomplished because something magical happens when you mix flour, water, and yeast combined with a bit of patience.
Using poolish in your Neapolitan pizza dough will:
- Make a more stretchy (extensible) dough that’s easy to work with
- Improve the flavor of the pizza crust
- Create a taller, softer, and lighter rim on your pizza
Benefits of using poolish for Neapolitan pizza
Benefits of using poolish in your pizza dough:
- It’s easy
- Takes less than 5 minutes of active work
- Makes planning easier
- Gives you a pizza dough that tastes and feels like a long-fermented dough that it is
When you make pizza using poolish (or any other starter), you add an extra step to your dough-making process. You first make the starter, then let it ferment, before adding it along with the other ingredients when making the main dough. This extra step will add an additional 2-24 hours to the pizza making. But it’s inactive time. Mixing the poolish itself will take you less than 5 minutes, the rest is just waiting. But it means you need to plan ahead when making Neapolitan pizza with poolish.
Poolish is one of the easiest preferments you can make. It’s also easy to use in your main dough because it’s pretty liquid it mixes easily with your other ingredients to create the main dough.
A huge benefit is that using poolish makes planning easier. Since most of the flavor is in the poolish, you can make a 4-8-hour main dough that tastes like a 24-hour dough. A 24-hour poolish is also more forgiving than a 24-hour (direct) dough.
What is poolish?
Poolish is a pre-ferment you add to your final dough to make it more extensible (stretchier) and improve the flavor of the crust. Poolish is a sponge made from equal parts flour and water, plus a small pinch of yeast. You then leave it to ferment for 2-24 hours to develop gluten and flavor.
Poolish comes from French baking and is therefore not the traditional choice for Neapolitan pizza. But both making and using poolish is easier than the more traditional Italian starter, biga.
When you leave your poolish to ferment, 2 things will happen; fermentation and gluten development.
The long, slow fermentation improves the flavor of your dough, giving it stronger and more complex aromas. Using poolish in the dough gives the yeast more time to develop these flavors because it’s an extra step before the main dough. In flavor development, the long fermentation time gives the yeast more time to break down more scratches in the flour. This will make that makes the dough more digestible.
The long fermentation time also gives the gluten in the flour time to fully develop. When you let the gluten network naturally develop over time through hydration, you will get a different gluten structure compared to kneading, When you knead your dough, you’re force-hydrating the gluten and creating a tighter, stronger gluten structure. So through long slow hydration, the poolish will become more extensible, and create a stretchier dough. This will also result in a taller, airier pizza crust, due to less resistance in the dough, making it expand more when water evaporates during baking.
Poolish vs sourdough
There are several types of pre-ferments, but the two main categories are sponges and sourdough starters. Poolish is a wet sponge, which is a starter made from water, flour, and baker’s yeast. A sourdough starter, on the other hand, is made from wild yeasts and lactic acid bacteria.
Pizza made from a sponge (like biga and poolish) will have a different flavor profile compared to pizza made with sourdough. Using s sponge will give your pizza crust a deeper, stronger, and more complex flavor, while sourdough will give your curst a sour flavor profile. Which pizza tastes better, depends on your personal taste. But poolish is easier to make than a sourdough starter.
Ingredients for Neapolitan pizza dough with poolish (6 pizzas)
To make 6 Neapolitan pizzas (10-12 inches) you need:
- 1000g pizza flour
- 600ml water (60%)
- 25g fine sea salt (2.5%)
- 1g instant dry yeast (0.1%)
And of course, you’ll also need Neapolitan pizza sauce, cheese, and your favorite toppings to put on your pizza.
Flour for Neapolitan pizza with poolish
When making poolish pizza that’s going to rise and ferment for more than 24 hours, it’s important to use strong flour that can handle the long fermentation. It’s also important that the flour has enough gluten.
For 24-hour poolish, you want flour with a gluten content of around 12-13% and a strength of W260-300. That will ensure proper gluten development and that your dough will be able to withstand the long fermentation time.
My go-to flour for Neapolitan pizza is Caputo Pizzeria, which is a Tipo 00 flour from Naples. Caputo Pizzeria is a high-quality flour designed specifically for baking at high temperatures. So unlike many other flours, it doesn’t burn as fast in a hot

Bread flour is also a good alternative to pizza flour.
Read more about pizza flour for Neapolitan pizza here.
Equipment you need to make Neapolitan pizza with poolish
For the poolish itself, you only need 3 ingredients: flour, water, and yeast. But you will need a few more things to make great Neapolitan pizza:
- Pizza oven (or
pizza steel for home oven) - Pizza peel
- Proofing box (or rising containers)
- Stand mixer with a dough attachment (optional, but it will make it easier)
I highly recommend using a stand mixer when mixing your poolish with the other ingredients to make your final dough. It’s going to make the process a lot easier. Poolish is wet and sticky, so mixing by hand or using a spoon or other kitchen tools will get sticky.
A proofing box is convenient when baking multiple pizzas. But it’s not strictly necessary.
You will also need a
You don’t need a huge, expensive wood-fired oven to make amazing Neapolitan-style pizza at home. An

If you make a purchease through this link, we earn a small commission at no additional cost to you.
You can make great pizza on a pizza stone or
You will also need a
How to make poolish for Neapolitan pizza dough
The first step is to make the poolish. This should be done around 18-24 hours before pizza time, so you let the poolish get enough time to develop flavor and gluten to give you the amazing crust you’re looking for.
Ingredients for the poolish
To make the poolish, you will use half the flour, equal parts water, and a small portion of the yeast, just enough to let the fermentation happen over 24 hours.
- 500g pizza flour
- 500ml water
- 0.1g instant dry yeast
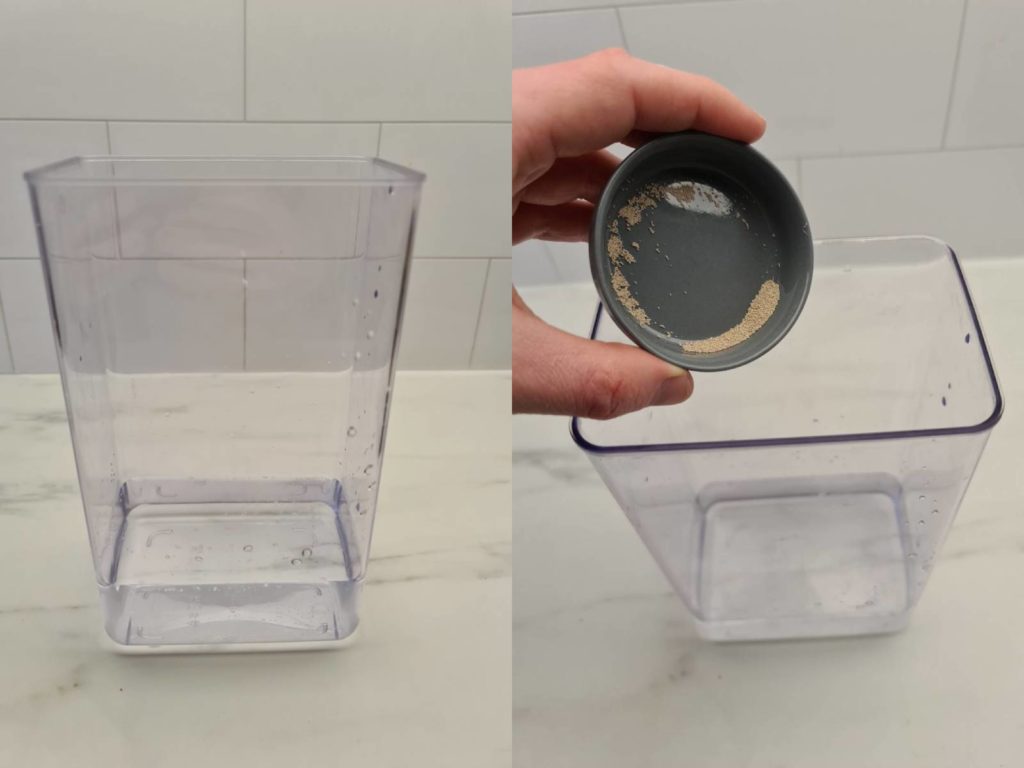
1. Measure ingredients for the poolish
It’s important to measure accurately, especially the yeast (and yes, you read it right, it’s 0.1g of instant dry yeast). So I recommend using a kitchen scale.
If you don’t have a scale that can measure 0.1g, this article shows how to measure smaller quantities of yeast than your scale can read: How to accurately measure yeast for pizza dough.
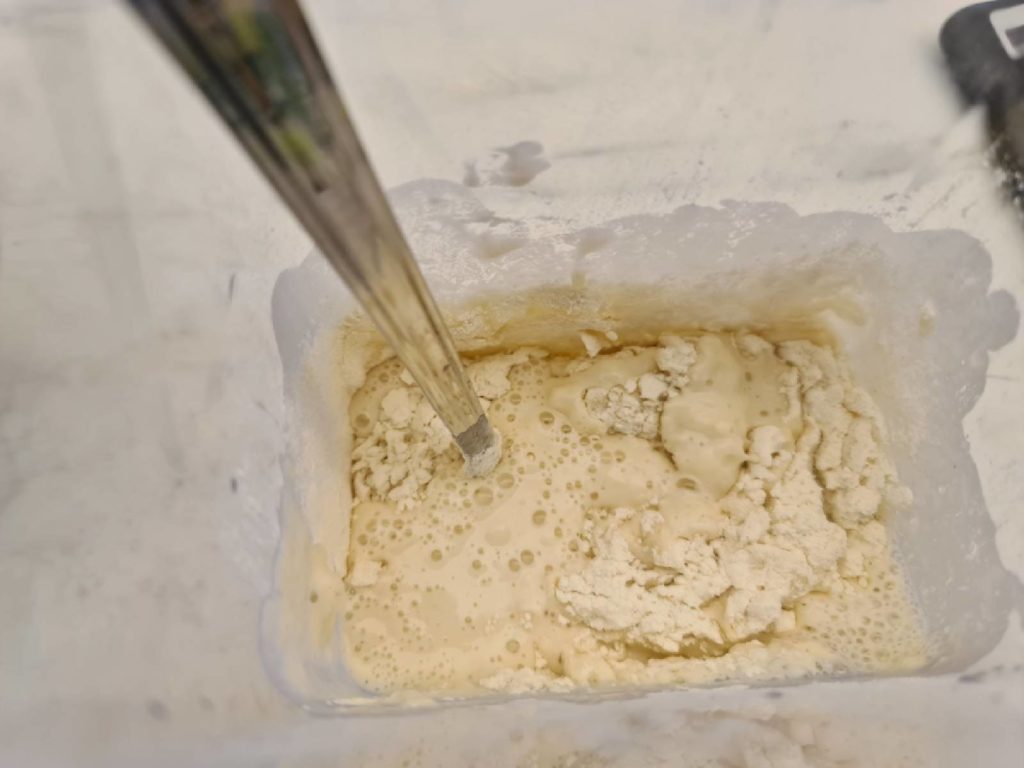
2. Combine the ingredients
Pour the water into a mixing bowl, sprinkle the yeast, and dissolve it in the water. Next, gradually add the flour while stirring with a spoon until all the flour is fully incorporated. You don’t need to knead the poolish but mix well for 1-2 minutes. It should be pretty runny (since it’s 100% hydration, equal parts flour and water).
3. Place the poolish in an air-tight container
Then move the poolish to an airtight container or a bowl with plastic wrap. But make sure the container has enough space for the poolish to double in size.
4. Let the poolish ferment for 18-24 hours
Now leave the poolish to ferment at room temperature (70F/22C) for around 24 hours. So tomorrow, we will use the poolish to make the main dough.
Make the main dough using the poolish
After 24 hours the poolish is ready. It should be bubbly and roughly doubled in size. It should have a slightly funky smell when you take off the lid. Perfect! Even though it smells funky now, it’s going to make an outstanding crust, just trust me!
Now it’s time to make the main dough. The poolish will be part of the main dough and therefore mixed with the remaining ingredients. The addition of the poolish is what will create both flavor and a more extensible dough.
To make the main dough, I recommend using a stand mixer to combine the ingredients, because the poolish is wet and sticky. A stand mixer is going to make the process easier. But if you don’t have a stand mixer, you can use a spoon or spatula to mix.
Ingredients for the main dough
For the main dough, you will use the other half of the flour, in addition to the remaining water and yeast, plus the salt.
- 500g pizza flour
- 100ml water
- 25g salt
- 0.9g instant dry yeast
1 Place the poolish in a mixing bowl
Transfer the poolish from the container to your stand mixer mixing bowl. The poolish will want to stick to the container but try to get it all into the mixing bowl. A dough scraper will be helpful.
Tip: If it’s hard to get the poolish out from the fermentation container, pour the water into the container, to get loose more of the poolish before adding it to the mixing bowl described in the next step.
2 Add the remaining water, flour, and yeast and knead the dough
Dissolve the yeast in the water and pour the mix into the mixing bowl with the poolish. Set your stand mixer to low speed, and let it run for around 1 minute until the poolish is incorporated into the water.
Next, gradually add your flour, while the mixer is still running on low. When the dough starts to come together, turn up the speed to medium and let it run for 15 minutes.
Pizza dough can be tough for your stand mixer, so if it can’t handle the amount of dough, you can mix it in two batches. Or knead the dough by hand instead when it starts to come together.
3 Add salt
Lastly, a couple of minutes before the dough is done, add the salt.
The reason you add the salt last is that it will affect gluten development, creating a stronger and tighter gluten network that will be even tougher for your stand mixer. Read more about how salt affects Neapolitan pizza here.
4 Let the dough rest for 15 minutes
Leave the dough to rest for around 15-30 minutes. This will relax the gluten, making the dough more extensible and pliable. Then fold it up to a nice, round ball.
5. Bulk fermentation for 2 hours
Place the dough in a rising container or bowl covered in plastic wrap, and leave it to bulk ferment for 2 hours.
(Cold fermentation – optional step)
If you have the time and want an even more flavorful dough, place the dough in the fridge for an additional 24 hours. This will make even more amazing pizza!
6. Divide the dough into 6 dough balls
Take the dough out from the rising container, and divide it into 6 dough balls of 250g. Each dough ball will create one, individual Neapolitan pizza.
7. Ball fermentation (8 hours)
Place the dough balls in a rising box, or individual, air-tight rising containers, and leave to rise for another 8 hours.
Stretching and topping your pizza
Start by preparing a small pile of flour on your working surface. Then move one pizza dough ball from the rising box using a dough scraper and place it in the flour. Turn it on and make sure the surface isn’t sticky. Shake off any excess flour and move the dough ball to a clean working surface.
Start by pressing the center of the pizza flat to make an even base. But leave an untouched rim of around 1/2 inch (1cm). This will puff up in the oven and create a nice, crunchy, and soft edge.
Rotate and turn it over a few times, until you have a round, flat pizza base of around 8-9 inches (80% of the final size of the pizza).
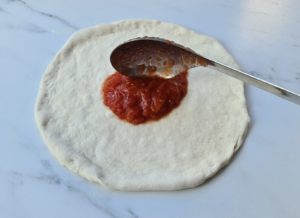
Then top the pizza with sauce, cheese, and your favorite toppings.
I have a comprehensive guide to baking Neapolitan pizza if you want all the details: Neapolitan pizza.
Baking the pizza
Start by preheating your
The time it takes to preheat the oven depends on the type of oven you’re using, the size, and the fuel source. A wood-fired oven can take a few hours to come to a temperature, while a small gas oven can get hot in less than 30 minutes.
Then, move your pizza from the worktop to a
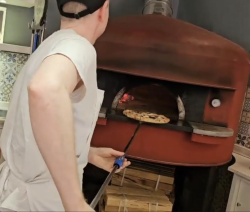
Move the peel over to the oven, and slide the pizza off, onto the hot floor of the oven.
Let the pizza sit for 15-30 seconds. If you try to touch it before it sets, it will probably stick to the floor. You will see the crust puff up and get tall and start browning. At this point, you want to turn the pizza to make sure it gets an even bake and doesn’t burn. The best tool for this job is a pizza turning peel. A regular
Also, check the bottom of the pizza. You don’t want that to burn either. If the bottom finishes before the top of the pizza, you can simply finish the pizza by “doming”: lifting the pizza closer to the dome where it’s hotter.
The pizza should be done after around 90 seconds. Then, remove it from the oven using the
Baking Neapolitan pizza in a home oven
If you don’t have a
You can find more details on baking pizza on a
Neapolitan pizza dough with poolish
Ingredients
- 1000 g pizza flour
- 600 ml water
- 25 g fine sea salt
- 1 g instant dry yeast
Instructions
Poolish (preferment)
- Measure 500g of the flour‚ 500ml of water and 0.1g of the instant dry yeast using a kitchen scale.
- Add al the water to a mixinb bowl and disvolve the yeast.
- Gradually add the flour while mixing using a spoon.
- Place the poolish in an air-tight container or in a bowl covered in plastic wrap.
- Leave the poolish to ferment for around 24 hours at room temperature (68-72°F/20-22°C)
Main dough
- After 24 hours, the poolish should be bubbly and roughly doubled in size.
- To make the main dough, move the poolish to your stand mixer bowl. Pour in the remaining 100ml of water and 0.9g of yeast. Set your stand mixer to low speed, and let it run for around 1 minute until the poolish is incorporated into the water.
- Gradually add the remaining 500g of flour while the mixer is running on low speed until all the flour is incoperated and the dough starts to come togeter.
- Let the mixer run at medium for 15 minutes.
- Add the 25g of salt and let the mixer run for another minute.
- Let the dough rest for 15-30 minutes to relax, then fold it up to a nice, round ball and cover the mixing bowl with plastic wrap or move it to an air-tight gonctainer, and let the dough bulk ferment fro 2 hours.
- Move the dough to your countertop and divide into 6 dough balls of 250g.
- Place the dough balls in a rising box and leave them to rise for 8 hours.
Stretching and topping your pizzas
- Place the dough ball in a small pile of flour and press it gently from the center using the palm of your hands. Make sure to leave 1/2 inch (1cm) around the edge of the dough to form the rim (cornicione). Then stretch it into an 8-9 inch disc.
- Top the pizza with sauce, cheese and your favorite topppings.
Baking the pizza
- Transfer the pizza over to your pizza peel and stretch it to its full size of 10-12 incehs before launching it into your hot pizza oven. The floor temperatrue should be around 800°F (430°C).
- Bake the pizza for 60-90 seconds in a pizza oven, and make sure to turn it to get an even bake.In a home oven, bake the pizza on a preheated pizza stone or steel for 4-8 minutes.
- Using the pizza peel, remove the pizza from the oven, transfer it to a serving plate and serve immediately. Neapolitan pizza should be eaten hot, right from the oven!
Related


- Neapolitan Pizza Dough Planner - June 7, 2026
- Is Your Pizza Dough Too Dry? Here is How to fix it! - June 10, 2024
- The Ultimate Guide to the Pizza Dough Windowpane Test - June 8, 2024
Wow, I think this is the best pizza I have ever made! Poolish pizza will definitely be my go-to from now.
Awesome!
What is the temps of the water with each step?
I use room temperature water for the poolish (around 20°C/68°F) and cold, refrigerated water for the main (4°C / 40°F).
Andreas, your website is incredible! Thanks for all the tips and tricks.
What would you say is your most traditional, best tasting, Naples style pizza recipe? This one? Your cold fermentation recipe? Your basic recipe? You have so many to choose from I can’t decide which to start with. I have all the equipment to do any of them, and I don’t mind the extra effort.
Perhaps not the most traditional one, but this is my personal favorite and the one I make the most. It always turns out great. And you can also stick it in the fridge overnight if it fits your schedule better. And the result is best in a pizza oven, of course!
Hi Andreas. The 5-star rating is based on previous recipes from your amazing site because this one is a work in progress. I recently made your cold-fermented dough recipe – an absolutely brilliant outcome when cooked for 2-min using a Breville pizza oven. Today, I began the poolish method using your recipe – so far so good. As an optional step, you offer a 24h period of cold fermentation as per below:
“if you have the time and want an even more flavorful dough, place the dough in the fridge for an additional 24 hours. This will make even more amazing pizza!”
Do you recommend skipping the room temperature 2h bulk fermentation and replacing it with a 24h cold bulk fermentation? Or should I first do the 2h bulk fermentation at room temperature? If so, could I form the dough balls after 2h and then leave them in the fridge for 24 h?
I’m happy to hear that your cold-fermented pizza turned out great!
I usually do 2 hours at room temperature first, then place it in the fridge, but sometimes I skip it if I don’t have time.
And you can absolutely make the dough balls first, then let them cold ferment for 24 hours. The reason I usually bulk ferment in the fridge is that it gives me a bit more control over how relaxed the dough balls are when making them post cold-fermentation.
But there are a million ways to make amazing pizza, so don’t be afraid to experiment – Good luck!
This one turned out perfect! Thanks for sharing.
Thanks for sharing!
What if room temperature is closer to 80 degrees or higher?
Then I would cut back on the yeast and let the poolish ferment shorter.
Instead of 1 g of instant dry yeast, try half, 0.5g. And let the poolish ferment for 12 hours instead of 24.
I love Neapolitan pizza but I have had a struggle getting a tall light crust. But this recipy turned out very well! I will try it again next weekend.
Absolutely delicious! I made this for my family last night and it was a huge hit! Highly recommend if you want real Neapolitan pizza!
I’m interested in trying this dough recipe, but I usually make 1 or 2 pizzas at a time. So I would want to freeze some of the dough. I would assume that I would want freeze the dough balls after the bulk ferment was done. I’ve used frozen dough that I’ve made and usually thaw the dough ball out in the refrigerator overnight and then several hours at room temperature. Would I want to leave them at RT for 8 hours after they’ve thawed in the fridge?
Yes, if you thaw the dough balls in the fridge overnight, they will probably rise a bit in the fridge (depending on the fridge temperature), and also get more relaxed. So I would try to cut the room temperature time to 4-6 hours, instead of the full 8 hours.
Turned out super delicious!
when you devide the dough into 6 balls you end up with ±270g balls.
6 x 250 is not 1626g
Perfect! Thank you: 5/5
Thanks, this is the best pizza recipe I’ve tried so far!
Hi, wondering if I can use this Poolish dough recipe as my go to recipe for any pizza that I desire( margarita , marinara, Roman, neopolitan, etc) or would say that the recipe is designed specifically for a neopolitan style. If so how can I use a Poolish preferment for the other styles . Love your website and recipes and look forward to your suggestions. Thanks
Yes, you can absolutely use a Poolish for various types of pizza doughs, including Neapolitan, Roman, New York, and so on. Poolish is a fantastic tool that can help develop flavors and improve the texture of your dough.
However, keep in mind that each style of pizza dough has its own unique characteristics. When adapting the Poolish-based recipe to other styles, you’ll want to consider the specific requirements of that style, such as hydration level, oil content (if any), and fermentation time.
So you might want to start with a dough recipe for the specific pizza you’re aiming to make and incorporate Poolish as part of the process, rather than strictly following this exact dough recipe.
I am interested in making a sourdough pizza crust, for my daughter who is gluten intolerant. Hoping you have a recipe.
Thank you, Diane
I’m sorry, I don’t currently have any glute free sourdough pizza recipes. I have a plan to look into gluten free pizza in the future, but unfortunately I have limited experience with that.
I’ve hear great things about Caputo Gluten Free Pizza Flour (even though it’s a bit expensive), and several people have told me that it’s the closest you get to a regular Neapolitan pizza without gluten, so it can be worth looking into. Perhaps this is a good place to start: https://eu.ooni.com/blogs/recipes/gluten-free-pizza-dough
For a lunch time pizza bake. After dividing into balls, and a bench rest of 8 hours, can I place overnight in the refridgerator and then pull out several hours before lunch? Should I shorten the 8 hour bench proof? Just trying not having to wake up at 5 am to make pizza balls.
Absolutely, refrigerating your dough is a great way to work around your schedule – no need to wake up at 5 in the morning! Just let your dough balls sit out for at least 2 hours before you start shaping your pizzas, so they can come back to room temperature.
I do this all the time. I’ll usually stick to the same total number of hours at room temperature since there will be very little yeast activity in the fridge. For example, I’ll let the dough proof for 5 hours at room temperature, then put it in the fridge, followed by 3 hours at room temperature before shaping and baking the pizzas.
Your site is amazing. It is straightforward and easy to follow. Interested in knowing your thoughts on the PIZZAPP to modify quantities of dough required. Truly appreciate all your efforts. Thank you.
Thank you! I think PizzApp is a useful tool to do pizza calculations and scaling dough. I don’t find the yeast quantities to be 100% accurate, but it gives a good starting point.
Great recipe! One question… Say I were to use this recipe but use a home oven to cook it, would it make sense to add some olive oil? If so, i’m assuming it would be good to add it during the second phase where you add the other half of the ingredients?
Yes, you’re right! If you want to bake it in a home oven, I recommend adding around 3% olive oil toward the end of kneading after adding the other ingredients.
Poolish is a Polish bakers concept imported to France 🇫🇷fyi
Can you cut this recipe in half?
Yes, absolutely!
if i want to only make 4 pizzas can I scale this recipe?
if i want to only make 4 pizzas can I scale this recipe?
Absolutely!
I used this recipe and it was SO GOOD! I didn’t refrigerate the poolish and it was still fabulous. This is my go to pizza dough recipe from now on! Thank you!