A
What Is a Pizza Steel ?
A
Why A Pizza Steel Makes Better Pizza
In short, the reason a
The secret to this unique crust is the quick bake. When you have a high enough temperature to bake the pizza in 60-90 seconds, the crust doesn’t have time to dry out, and will only be crispy on the outside. So you can achieve this in a wood-fired oven because it can reach 900°F (480°C) using fire.
In a home oven, on the other hand, you need a much longer baking time to get a crispy crust, because it’s not hot enough. When you bake pizza for 10-15 minutes, or even more, most of the water in the crust will evaporate. And what you’re left with is a crust that’s very dry all the way through. The consistency is more like a cracker, crispy on the outside and then soft on the inside.
So how can we accomplish a quicker, hotter bake in a regular home oven? The answer is a
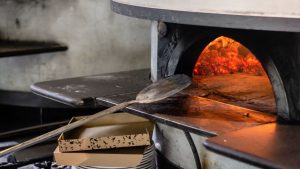
How a Wood-Fired Oven Bakes Pizza
A wood-fired
In a wood-fired oven, the heat source is the fire. Typically, you start the fire in the middle of the oven, to heat the floor. Then you move it to the back or side of the oven. Due to the dome-shaped ceiling, the heat from the flames will circulate inside the oven, and when it reaches a certain temperature starts reflecting down from the ceiling. This will give an even bake of both the top and bottom of your pizza.
Almost Like a Wood-Fired Oven in Your Own Kitchen
A
How a Pizza Steel Works
A
Retaining heat, simply means that the steel holds on to the heat well when you heat it and can stay hot for a long period of time. On the flip side, it means that it takes longer to heat the steel. But when it’s hot, it will keep on that heat for a long time. This is one of the benefits of a
Steel also conducts heat well, meaning it can transfer the heat it’s holding onto faster than most other surfaces. Steel is one of the materials that conduct heat best, making a
The conductivity and ability to retain heat is a killer combo to bake pizza faster, at a higher temperature, and is why a
Pizza Steel Temperature
When it comes to temperature, the higher, the better. You want to use the
Pizza Steel Broiler
The second part of the pizza bake equation is the reflecting heat from the dome of the
The extra heat provided by the boiler will also heat your
Pizza Steel Baking Time
It takes 3-8 minutes to bake a pizza on a hot
Pizza Steel Thickness
In addition to the temperature, how thick your
One thing that’s important to understand is that you need a balance between the temperature your oven can reach, and how thick your steel is. The reason is that you want both the top and bottom of the pizza to be done at the same time.
If your
Pizza Dough for Pizza Steel
You can bake any kind of pizza on your
If you’re going for a proper Neapolitan-style pizza, I also strongly recommend this easy, authentic pizza sauce.
How to Use a Pizza Steel : Step-by-Step
Now that you know how a
1. Place the Pizza Steel in the Oven
The first thing you want to do is to place your
If your oven has a broiler, I recommend placing the steel around 2 inches (5cm) from the broiler. To get that close, you probably have to place the steel on the top rack of your oven. The closer you are, the higher the temperature, and this will increase the baking speed. But you don’t want to get too close to the broiler, as this can burn the pizza too quickly.
If your top rack is too far from the broiler, a trick I used in my old oven was to place a deep baking sheet upside-down and put my steel on top. This way I could get the steel around 2 inches (5cm) from the broiler.
2. Preheat the Pizza Steel
The next step is to turn on the oven and preheat the
I also recommend turning on the broiler towards the end of the preheating, to make the steel even hotter.
3. Get the Pizza Ready
Now it’s time to get your pizza ready. Make sure the pizza dough is at room temperature before you start preparing your pizzas (if you e.g. made a cold fermented pizza dough).
You want to stretch the dough out to a thin disk, but leave an untouched rim that will form your cornicione. This rim will puff up when you bake the pizza in the hot oven and create a light, airy crust.
Also, make sure not to overtop your pizza. You want it to be thin and don’t have too much sauce, cheese, or topping, so it can bake faster. More moisture from sauce and toppings will increase the baking time because more water needs to evaporate before the crust can start to crisp up.
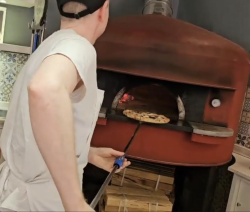
4. Transfer the Pizza Into the Oven
The next step is to move the pizza from the working surface, at which you prepared it, into the oven. The best way to do this is using a pizza peel.
When your pizza is ready, drizzle a little bit of semolina on the peel, before you slide the pizza onto it. This will make sure the pizza doesn’t stick to the peel.
Other options to avoid sticking are fine wheat flour and cornmeal, but both of these options add flavor to the crust. Especially since they burn easily on the hot steel, adding a rather unpleasant flavor to the crust. I, therefore, recommend sticking to the more classic choice: semolina. If you’re interested in reading more about dusting the
You also want to minimize the time the pizza is on the peel, because the longer it sits, the more likely it is to stick.
The last thing before the pizza goes into the oven is to shake the peel lightly, to confirm that the pizza is moving freely and isn’t stuck. You don’t want to discover that a corner of the pizza doesn’t want to leave the peel when half the pizza is already on the steel. I’ve made this mistake myself, and trust me, it will be messy!
To launch the pizza into the oven, simply position the
5. Bake the Pizza
Depending on the temperature of your oven and how thick your
How to Use the Broiler to Increase the Temperature
To maximize the temperature in the oven, you want the broiler to be on when the pizza is in the oven. When the oven has been preheating for an hour, it’s usually so hot that the broiler turns off. And only turns back on if the temperature drops, to make sure the oven comes back up to temperature.
What you can do to trick the broiler to stay on during baking, is to turn it off, and lower the temperature of the oven a few degrees 5 minutes prior to baking. Then right after you put your pizza in, turn on the broiler again, and crank the heat back up. This will ensure the broiler is one for most of the baking time. The
Just a quick warning: you have to keep a close eye on the pizza if you use the broiler trick. The pizza will go from done to burnt very quickly!
Reheat the Oven Beteen Pizzas
If you’re baking many pizzas, you need to re-heat the oven between every few pizzas. Even though the steel can hold onto the heat well, the temperature will drop when you bake multiple pizzas right after each other.
The cold pizza (room temperature) will lower the temperature of the steel. And when it’s baking, the pizza will block the steel from re-heating. You, therefore, need to let the
If your
Turn the Pizza
Most ovens have an uneven heat distribution, you therefore may need to turn the pizza to make sure it bakes evenly. The easiest way to do this is to pull the pizza out with your
How to Tell When the Pizza Is Done
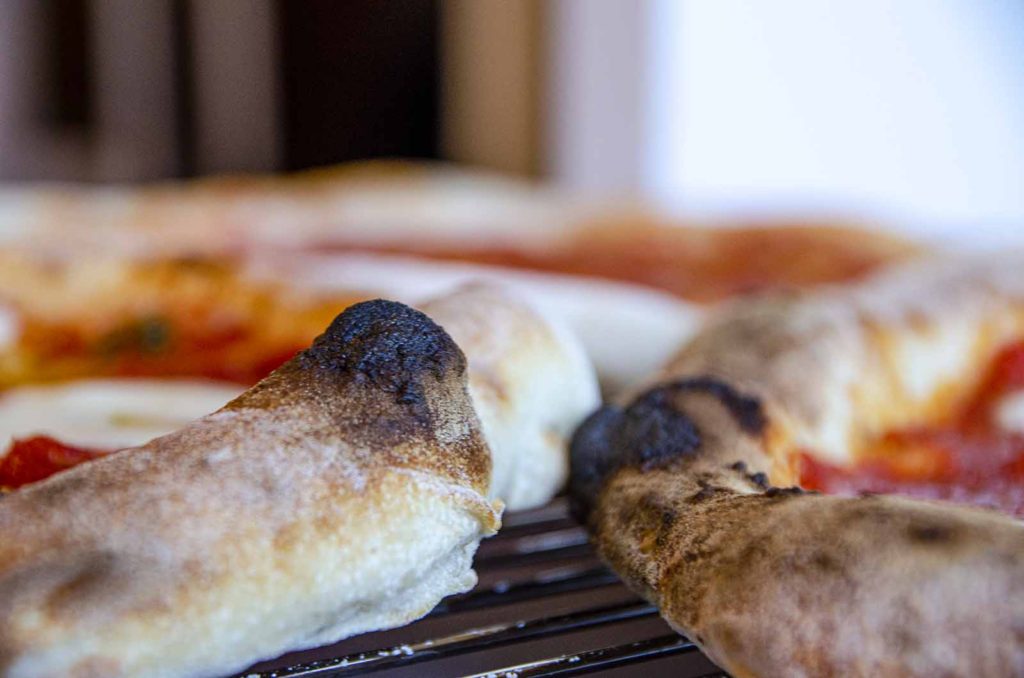
The pizza is done when the cheese is melted, and the crust has started to brown and has some leoparding (if you’re using the broiler). You don’t want to leave it any longer, because the crust may dry out if you leave it too long. Get your
6. Serve the Pizza
Time to serve your amazing Neapolitan-style pizza! Either place it directly on a large plate and serve, or on a wooden cutting board for cutting it into slices. Enjoy!
7. Let the Pizza Steel Cool Completely
When you’re done baking, turn off the oven, and leave the
After pizza night, I usually let the steel cool in the oven overnight, and clean it the next morning.
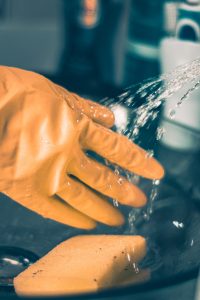
How to Clean a Pizza Steel
When the steel has cooled down completely, you often find pieces of burnt cheese, flour, and perhaps sauce. Since these stains are baked in such a hot temperature, they can be really hard to get rid of.
You should never put your
But how should you clean your
1. Get Rid of Burnt Food Soils
First, get rid of any burnt food stains. If your steel has any flour or ashes on it simply brush them off. Larger burnt pieces, such as cheese can usually be scraped off using a dough scraper.
If that’s not enough, you can also use your oven’s self-cleaning function, if it has one. Another option is steel wool.
2. Clean the Pizza Steel With a Nylon Brush and Hot Water
Next, remove any loose residue using a nylon brush and hot water. But don’t leave it soaking in the sink, or use dishwasher soap on your steel. The brush should be enough!
3. Dry the Pizza Steel
To avoid rust, dry the
I’ve also written an in-depth article on how to clean a pizza steel if you need more information.
How to Season a Pizza Steal
Just like a cast-iron skillet, your baking steel needs to be seasoned occasionally to prevent rust and corrosion of the steel. It will also help develop a non-stick surface.
Most pizza steels come pre-seasoned when you buy them, so if it’s your first time using a new
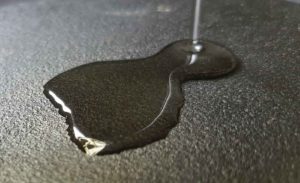
To season the steel, use vegetable oil with a high smoke point, such as coconut, grapeseed, peanut, or sunflower oil. I recommend Caron & Doucet Cast Iron Oil made from refined coconut.

Before you season the steel, make sure it’s clean and dry. Then spread a thin layer on the whole surface of the steel. Then wipe off any access oil using paper towels. Next, place the
When the time is up, leave it in the oven to cool completely, before you take it out.
Here’s the complete guide to pizza steel seasoning.
How to Store a Pizza Steel
Before you store your
Some steels also come with a protective cover, I recommend using that if you have one.
How to Remove Rust From a Pizza Steel
If you don’t dry the steel completely before you store it or skip seasoning, it may rust. The most common cause of rust is that the
To get rid of the rust, start with steel wool, and scour the surface until the rust is gone. If that’s not enough, you can also use fine sandpaper to remove the rust.
Then wash the steel thoroughly, dry it completely, and re-season it, as described above.
Related

- Neapolitan Pizza Dough Planner - June 7, 2026
- Is Your Pizza Dough Too Dry? Here is How to fix it! - June 10, 2024
- The Ultimate Guide to the Pizza Dough Windowpane Test - June 8, 2024
Very helpful write!!! I have more courage to bake pizza now!!!!
I’m happy to hear that! 🙂
I’ve been failing for a year. Still, a no go. I just tried my new 1/2 pizza steel yesterday. Preheated the oven for 1 and hours – 550
Top rack and used broiler during the cook. Top of pizza came out perfect. Bottom was almost raw. Well, not quite, but clearly did not cook fast enough. Next I put two pizzas in and left the oven on Bake (550). Took longer, and bottom was better, but still not quite as done as the top. I am still testing. So next I will move the steel to the center rack position. I may also try to preheat for 2 hours. Once the bottom burns before the top is done, I know I can move the rack up to dial in the best position.
Every oven is different, so it will require some testing to get it just right. Have you tried preheating the pizza steel using the broiler?
Move the steel to the bottom rack and work your way up since you are having major issues with the bottom crust. The steel will get much hotter on the bottom usually. Also check your oven user manual…you can usually adjust the temp even hotter. You shouldn’t need to preheat more than an hour, but you should buy an IR temp reading gun to check the temp and find when the plate is not getting any hotter. Test on each level of the oven so you know exactly what your oven is doing to the plate at each level. The broiler is usually only needed at the end for like a minute or so to brown up the top. Of course, that’s my oven.
Every oven is different, so the most important thing is to experiment. But using an IR thermometer is a great tip!