Pizza is one of the most popular dishes in the world, and probably your favorite. It can be hard to get your hands on great Neapolitan pizza. But you don’t need to travel to Italy to have authentic Neapolitan pizza. With a few simple ingredients and the right tools, you can make better pizza than your local pizzerias. This article will show you everything you need to know to make amazing authentic Neapolitan pizza dough!
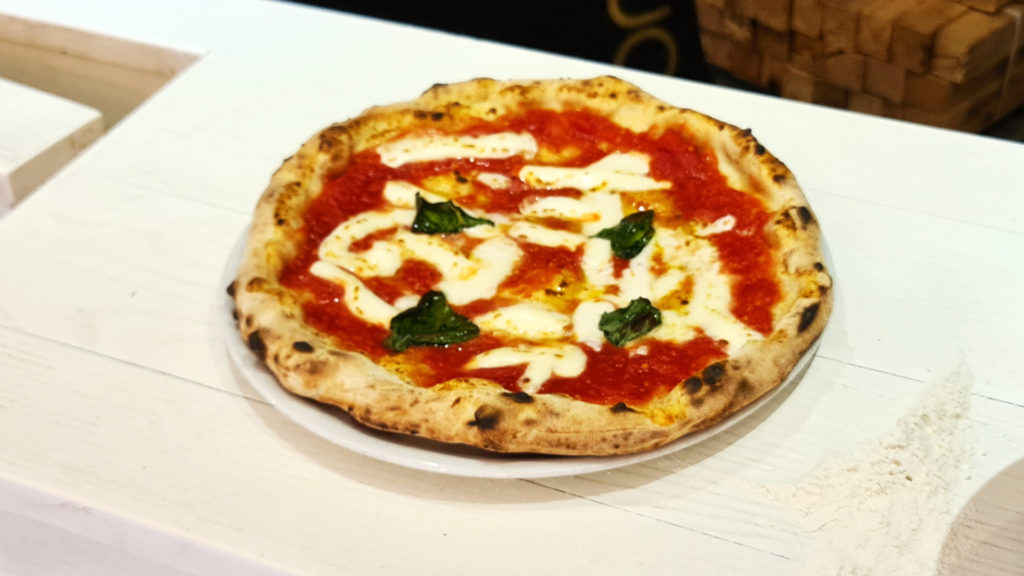
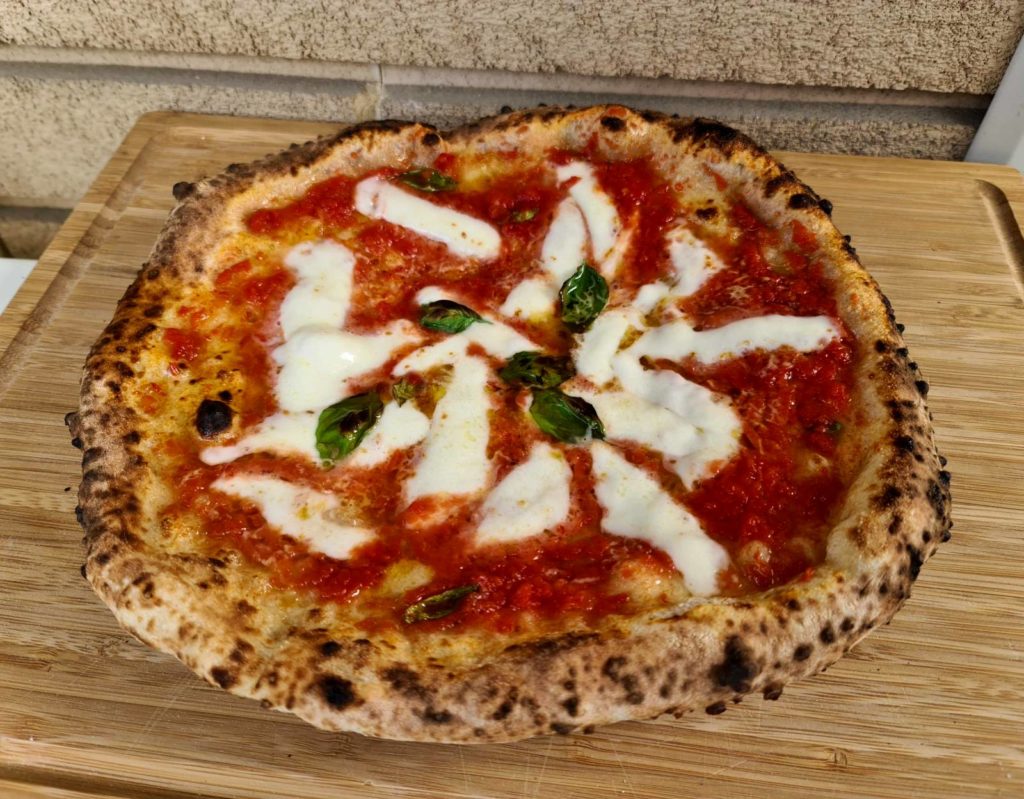
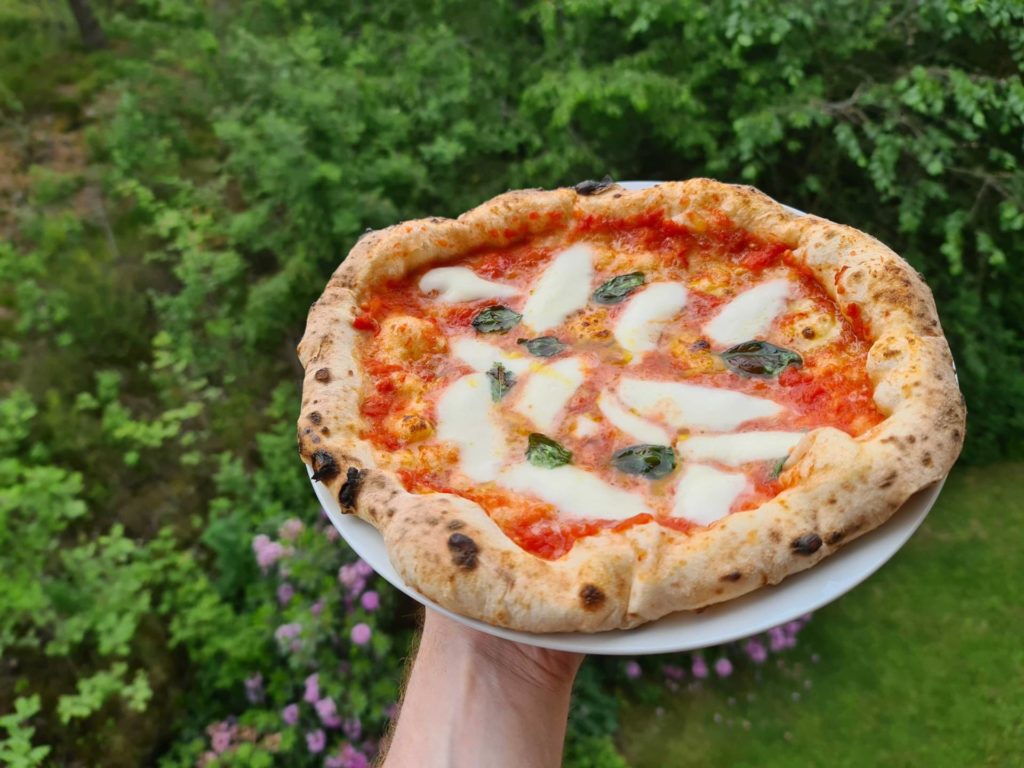
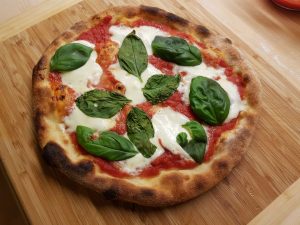
Jump to the recipe summaryNeapolitan pizza is a round pizza with a raised, slightly crunchy, and slightly edge. Topped with San Marzano tomatoes, mozzarella, and one, or a couple of well-balanced toppings. But the two things that make Neapolitan pizza stand out are the flavor and consistency of the crust.
Anyone can make authentic Neapolitan pizza
You might think it’s hard to make authentic Neapolitan pizza at home. But anyone can do it! All you need is time and a hot oven.
There are many variations of Neapolitan pizza dough, but this is the traditional: direct dough fermented at room temperature. And all you need is 4 ingredients: flour water salt and yeast.
Time equals flavor. And the crust gets its flavor from a long, slow rise. This is a 24-hour pizza dough that gives plenty of flavors and can fit most people’s schedules.
What gives the crust the crunchy exterior combined with a light, soft interior is a really quick bake at a high temperature. That’s why you traditionally bake Neapolitan pizza in a wood-fired oven. Without the high temperature, you can make great pizza, but not authentic Neapolitan pizza. So you will need a wood-fired oven or another
True Neapolitan pizza is defined by the AVPN’s international regulation. But they are hard to understand and follow. I’ve therefore simplified the process into this step-by-step recipe that anyone can follow. Below the recipe, you’ll find more details about the process, how, and why – all you need to make the perfect Neapolitan pizza!
Ingredients for Authentic Neapolitan Pizza dough
Authentic Neapolitan pizza dough consists of only 4 simple ingredients: flour, water, salt, and yeast. And to get the best result, make sure you use quality ingredients.
This will make 6 Neapolitan pizzas of 11-12 inches:
- 922g Tipo 00 flour (100%)
- 553ml cool water (60%)
- 23g of fine sea salt (2.5%)
- 1g of fresh yeast (0.1%) or 0.28g of active dry yeast (0.03%)
What you’ll need to make Authentic Neapolitan pizza dough
Here are a few things you need to make Neapolitan pizza:
- A mixing bowl
- A kitchen scale (preferably an accurate 0.01g scale) to measure ingredients
- A proofing box (or alternatively small air-tight containers that can hold one pizza dough ball each)
- A
pizza peel to transfer the pizza in and out of the oven - A pizza oven (alternatively a pizza stone or steel – but heat is key!)
- (optional) A dough scraper or spatula to handle the dough
- (optional) An infrared thermometer to check the temperature of your oven
You’ll also need Neapolitan pizza sauce, cheese, and toppings for the pizza.
How to Make Authentic Neapolitan Pizza dough from scratch step-by-step
- Add water to a mixing bowl and dissolve the salt.
- Add 10% of the flour while mixing with your hands or a wooden spoon.
- When you have a smooth, batter-like consistency add the yeast and dissolve it (you don’t want the yeast to be in direct contact with salt, as this may damage it).
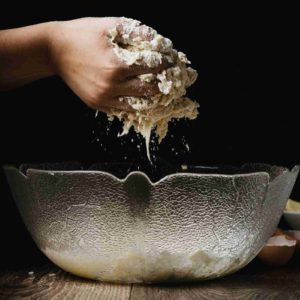
- Gradually add the rest of the flour while mixing, until you end up with one, single mass.
- Move the dough out of the mixing bowl to the countertop, and start kneading. Knead the dough by hand for 15-20 minutes, or in a stand mixer at low speed for 10-15 minutes, until you get a pretty smooth dough. The goal is to develop gluten and incorporate air into the dough.
- Leave the dough covered to rest for 15-30 minutes.
- Fold the dough over itself a few times and form a smooth, round dough.
- Place the dough in an airtight container, or in a bowl covered in plastic wrap, and let it rise for around 14 hours.
- After 14 hours, take out the dough, and cut it into dough balls of 250 grams each. Make sure the dough balls are smooth and even to get round, nice pizzas.
- Place the dough balls in a lightly floured proofing box and let them rise for another 10 hours. If you don’t have a pizza proofing box, you can place the dough balls individual bowls with lids or cover them with plastic wrap instead.
Preparing and baking the pizza
- Preheat your oven. If you use a wood-fired
pizza oven , preheat it until the floor of the oven is around 850°F (430°C) and the ceiling is around 900°F (480°C). You can check the temperature using an infrared thermometer. If you use a home oven, place a pizza stone or steel in the oven and preheat on the hottest setting for at least 1 hour. - Take out one dough ball from the rising box using a dough using a pizza spatula or dough scraper. Sprinkle some flour around the edge of the dough ball and use the spatula to loosen all the sides (if it’s stuck to other dough balls or an edge), then get it under the ball and lift it right out.
- Place the dough ball in a small pile of flour and press it gently from the center using the palm of your hands. Make sure to leave 1/2 inch (1cm) around the edge of the dough to form the crust (cornicione). Then stretch it into a 10-11 inch (25-27cm) round disc.
- Get rid of any excess flour from the dough and place it on a clean part of your countertop.
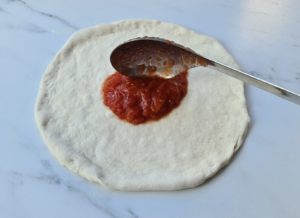
- Add 60-80g of Neapolitan pizza sauce in the center of the disc, and spread it evenly with the back of a spoon using a circular motion.
- Add cheese and other toppings.
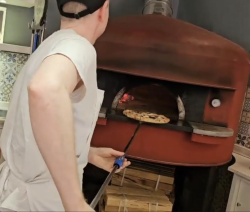
- Slide the pizza onto your
pizza peel and quickly transfer it into the oven. You want to work quickly to prevent the pizza from sticking to the countertop or the peel. - Bake the pizza for 60-90 seconds in a
pizza oven , and make sure to turn it to get an even bake.
In a home oven, bake the pizza for 4-8 minutes on a pizza stone or steel, depending on how hot your oven is. And if you have a grill function or broiler, turn it on during baking for an even hotter bake. That’s going to get you pretty close to the heat of apizza oven ! - Using the
pizza peel , remove the pizza from the oven, transfer it to a serving plate, and serve immediately. Neapolitan pizza should be eaten right from the oven!
What is Authentic Neapolitan Pizza?
Naples has a long history of pizza and is the birthplace of pizza as we know it today. Neapolitan pizza is a simple and well-balanced dish made from high-quality ingredients. The crust is the most important element of Neapolitan pizza, and time and patience are what develop the flavor of the crust. Neapolitan pizza is also baked in a wood-fired oven, which gives the pizza its characteristic charred crust.
Naples has a long tradition of pizza, dating back to the 18th century when the Neapolitans started adding tomatoes to their flatbreads. At the time pizza was considered ‘peasant food’, and was sold from carts in the poor parts of town. Now pizza is known all across the world!
The traditions are protected by the AVPN (The True Pizza Association), and their international regulations for true Neapolitan pizza. In 2017 the culinary practice of Neapolitan pizza baking was even granted UNESCO status.
It’s all about the crust!
The crust is the star of the show. Sauce, cheese, and toppings are simply condiments that add to the crust. That’s why most Neapolitan pizza only has a few well-balanced toppings. And that’s also why I’ve dedicated this long article just to get the dough right.
What makes Neapolitan pizza different
Neapolitan pizza is thin, round, and has a raised edge (called “cornicione”). The rim of the pizza puffs up in the oven and gets tall, crispy on the outside, and soft on the inside. A very unique consistency that you can only achieve through a short, very hot bake.
Most people think Neapolitan pizza should be crispy, but that’s only true for the rim of the pizza. The center is soft, or moist, and is most suitable to be eaten using a knife and fork.
AVPN: True Neapolitan Pizza
To be considered a true Neapolitan pizza, you have to follow the strict regulations defined by the AVPN. The AVPN was founded in 1984 to protect the art of authentic Neapolitan pizza. The organization defines everything in the pizza baking process from the ingredients and toppings to the method of making the dough.
That’s why this recipe is based on AVPN’s regulations. That’s what true Neapolitan pizza is!
AVPN requirements for True Neapolitan pizza
Some of the most important requirements from the AVPN international regulations for Neapolitan pizza are:
- The diameter of the pizza should be between 22 and 35 cm (8.5 to 14 in)
- Each dough ball should be between 200 and 280 grams
- The center of the pizza should be 0.25 cm (0.1 inches) in the center
- Should use Tipo 00 (W250-310) or Tipo 0 flour (W250-320)
- Leaving time 8-24 hours
- The pizza should be cooked in a wood-fired oven at around 485° C, on a floor that’s in the 380-430°C range in 60-90 seconds.
- The pizza should be consumed within 10 minutes of production
The regulations have many more details, but some of the main takeaways are that the dough should be made with a fairly strong flour with a strength of W250-320. The dough balls should be around 250 grams, and this will result in an 11-12-inch pizza.
The pizza should be baked at a high temperature. To be a true Neapolitan pizza according to the regulations, it needs to be baked in a wood-fired oven, however, the temperature and baking time is the important part. You’ll get pretty much the same result in any oven that can reach that temperature.
The 3 elements of Neapolitan pizza
Authentic Neapolitan pizza dough consists of three elements:
- Dough
- Sauce
- Toppings
So to make great pizza you need to understand and master each of these elements and how to balance them. In the following sections, I will go through each of these elements.
Sauce for Neapolitan pizza
Neapolitan pizza sauce is simple. It’s all about quality tomatoes because that’s what the sauce should taste like. All the other ingredients are added to balance and highlight the tomato flavor.
You just mixed raw, without pre-cooking it. The heat of the oven will cook the sauce during baking. But the short cooking time will preserve a lot of the freshness of the tomatoes.
For authentic Neapolitan pizza, you should use San Marzano tomatoes, which is an Italian plum tomato with a strong, sweet flavor and little acidity.
Neapolitan pizza sauce Ingredients for 4-5 pizzas:
- One 400g (14oz) can of whole, skinless tomatoes (preferably San Marzano tomatoes)
- 4g (a little less than 1 teaspoon) of sea salt
- 3-4 leaves of fresh basil
- 15g (1 tablespoon) of extra virgin olive oil
Instructions: How to make Neapolitan pizza sauce
Add the tomatoes, salt, basil, and olive oil to a mixing bowl, and combine all the ingredients. There you have authentic Neapolitan pizza sauce!
Check out the full recipe for more details.
Cheese and toppings
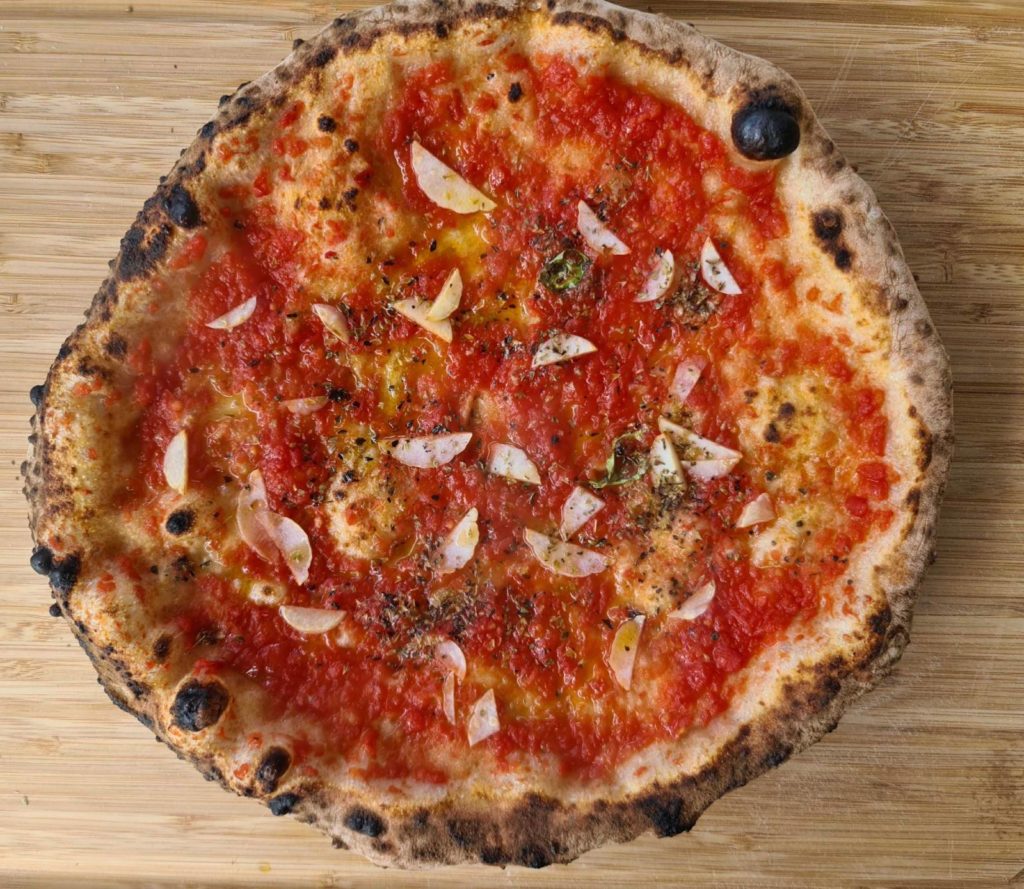
If you ask a Neapolitan, he would tell you there are only two types of pizza: Pizza Marinara and Pizza Margherita. These are the two traditional, Neapolitan pizza topping combinations that are based on local ingredients found in the Naples region.
Pizza Marinara
Pizza Marinara is possibly the first pizza ever invented. It was commonly eaten by poor sailors at sea because it’s made with easily preserved toppings.
Toppings for Pizza Marinara:
- 70-100g of tomato sauce
- 1-2 sliced cloves of garlic
- 5g of extra virgin olive oil
- A small drizzle of dried oregano
Pizza Margherita
Pizza Margherita is a classic known all over the world and by many considered the perfect pizza with its flavorful, well-balanced toppings.
Legend has it that the pizza was invented to honor Queen Margherita of Italy when she visited Naples in 1889. The toppings of the pizza represent the color of the Italian flag: red tomato sauce, white cheese, and green basil.
Toppings Pizza Margherita:
- 70-100g of tomato sauce
- 80-100g fresh mozzarella (fior di latte) or buffallo mozzarelle
- 3-4 large leaves of fresh basil
- 5g of extra virgin olive oil
- (Optional) 5 of pecorino or parmesan cheese
Cheese
The most common types of cheese for Neapolitan pizza are fresh mozzarella (fior di latte) and buffalo mozzarella. You want to stay away from low-quality grated supermarket cheeses. A standard Neapolitan pizza needs around 70-100g of mozzarella.
Hard, aged cheeses are also commonly added to pizza, like pecorino and parmesan. These cheeses give some saltiness and stronger flavors to the pizza. You don’t want to use too much of these cheeses, as they have a pretty strong flavor. A couple of pinches (around 5g) to one pizza is a good starting point.
Other toppings for Neapolitan pizza
The AVPN actually has a list of ingredients, but you can add your favorite toppings. Some common toppings are:
- Fresh tomatoes
- Oregano
- Basil
- Salt
- Olive oil
- Salmi
- Mushrooms
- Parma ham
- Olives
Pizza dough
Now the most important thing – the dough!
As mentioned earlier, it’s all about the crust. You can’t save a Neapolitan pizza by adding more toppings, if the crust is bad, it’s not going to be great Neapolitan pizza.
The two secrets to the perfect pizza dough are high-quality ingredients and time.
To make great pizza you need quality ingredients. Both for the dough and for toppings. The other part is time. It takes time for flavors to develop.
There are also other processes happening during a long leave, such as gluten formation. The gluten development will affect both the stretchability of the dough and the consistency of the final product.
The last key to great pizza dough is practice. No recipe can substitute experience. It takes time, and several attempts to master Neapolitan pizza dough. But don’t worry! I’ve tried to make this recipe as detailed as possible to give you a headstart. I just want you to know that Neapolitan pizza is an art that takes some practice to master.
The four ingredients of Authentic Neapolitan Pizza dough
Authentic Neapolitan pizza dough consists of only 4 ingredients: flour, water, salt, and yeast. And to make good pizza it’s important to use quality ingredients.
Measuring ingredients
To make consistent pizza dough, you need to measure your ingredients accurately.
Have you ever followed the same recipe, but it turns out a bit different every time? That’s probably due to inaccurate measurements. The perfect pizza dough starts with perfect measurements.
Small changes in the quantities of ingredients can have a huge impact on both the dough and the final pizza crust. If you for example add too much yeast, the dough will ferment faster than you expect, and over-proof by the time you’re ready to shape and bake the pizza.
Use a scale!
The most accurate way of measuring ingredients is using a scale. The reason is that weight is much more accurate than volume.
Imagine you have a bowl of flour, and press it as hard as you can using a spoon. How much can you compress it? So does the recipe ask for compressed flour or not? The amount of flour can vary tremendously depending on how it’s stored and handled.
Another issue is that volume measurements are not standardized. How large is a tablespoon, for example? My tablespoon is probably not the same size as yours.
That’s why bakers use recipes with the ingredients listed in grams. 100 grams of flour is the same no matter how compressed it is, and 10 grams of salt is 10 grams of salt no matter the size of your tablespoons.
I therefore strongly recommend investing in a gram scale. This will take the guesswork out of your pizza baking!
The best type of scale for pizza baking is one that can measure with an accuracy of 0.01 grams. That’s especially important for yeast since you use very small quantities. Often less than 1 gram.
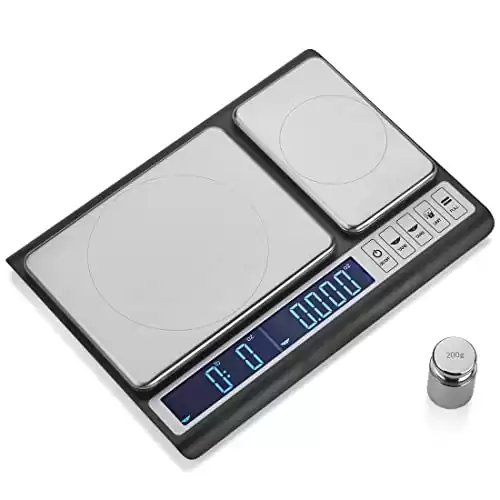
An accurate kitchen scale with two platforms that can measure up to 10kg at only 0.01g. Perfect for measuring both pizza flour and yeast
Read more about pizza scales and how to properly weigh ingredients here.
Flour
To make authentic Neapolitan pizza dough you need Italian Tipo 0 or Tipo 00 flour.
Tipo 0 and 00 are Italian-milled, finely ground wheat flour with medium-high protein content. Tipo 00 is the most used flour for pizza-making. The reason is that Tipo 00 is the finest milled flour on the Italian flour scale and also the highest quality flour, made from the core of the wheat.
The optimal gluten content for Neapolitan pizza dough is around 12%. The optimal strength is around W250-300, depending on the length of fermentation.
The protein content of Tipo 00 flour is around 12%. The medium-high gluten protein content is important to make an elastic, stretchy dough. When you’re kneading the dough, gluten strands get longer and stronger and make the dough strong and elastic. You can read more about pizza flour here.
There is nothing magical about Tipo 00 flour, it’s just high quality and contains the right amount of gluten. You can make great dough with other flours too since it’s the properties of the flour that matter the most, not where it’s from.
Gluten
Gluten is a collection of proteins found in wheat. These proteins are what hold the pizza dough together and make it elastic and able to keep its shape during a long leave. It’s also what allows you to stretch the dough and make a thin pizza without ripping the dough.
When gluten proteins absorb water they start to form a network, almost like a fishing net, that gives the dough structure. Kneading will strengthen this gluten network. And the more you knead, the stronger it gets.
Gluten also plays an important role in trapping gas that the yeast produces during fermentation, which is also why the dough increases in volume. When you knead the dough, small pockets will form, and these will be inflated by CO2 from the fermentation, almost like blowing up a balloon.
When you knead the dough the gluten also gets tense, and the dough gets more elastic and harder to stretch. So letting the gluten relax is important before you try shaping your pizza.
What is the best pizza flour for Neapolitan pizza dough?
One of the most used flours in Naples is Caputo Pizzeria. Caputo is considered one of the top pizza flour producers in the area, and the company is also an AVPN-approved supplier.
Caputo Pizzeria is a quality Tipo 00 flour with a gluten content of 12.5% and a strength of W260-270 making it ideal for a 24-hour rise.
I swear by Caputo Pizzeria and almost exclusively use it for my Neapolitan pizza dough. And it turns out great every time!

Read more about Caputo flours here.
Water
You should use clean, moderately hard water for Neapolitan pizza. Using bad water can mess with the yeast, and ruin the fermentation.
You should also start with cool water: 60-72°F (16-22°C).
Unlike most recipes, you don’t start with warm water when making Neapolitan pizza dough. The reason is warm water makes the yeast more active, something that will speed up the fermentation. And you definitely don’t want your dough to overproof in 2 hours.
The goal is to reach your fermentation temperature (room temperature) by the end of kneading. And since the mechanical work from kneading will increase the temperature of the dough, you start at a lower temperature.
If you use a stand mixer, you want to start with even colder water, because using a stand mixer will increase the temperature more than kneading by hand.
If the weather is hot, you also may want to start with colder water to slow the yeast down more.
Salt
For authentic Neapolitan pizza dough, you should use fine sea salt. Technically you can use any salt, but fine salt will dissolve more easily.
Salt does mainly 4 things for your dough:
- Strengthens glutens
- Slow down the fermentation
- Improves the flavor of the crust
- Helps brown and crisping of the crust
In short, the reason you add salt to pizza dough is to strengthen the gluten, so the dough gets stronger and more elastic. Salt also controls the rate of fermentation by slowing down the yeast. Neapolitan pizza dough contains 2.5-3%.
This combination allows a long, slow fermentation that will develop flavor. Salt also improves the flavor itself. So salt is the ultimate flavor enhancer.
Read more about salt and how it affects Neapolitan pizza dough here.
Yeast
Yeast is probably the most complicated ingredient in the pizza-making process. But also one of the most important ones.
Yeast is a single-celled fungus that eats sugar and turns it into flavor. More accurately, the yeast breaks down the carbohydrates in flour into alcohol and CO2. As a result, the dough will rise and develop flavor. When the dough has proper gluten development, the CO2 will also be trapped inside the dough, inflating it, almost like a balloon. The yeast also makes the dough more digestible when it breaks down the carbohydrates in the flour.
The amount of yeast you add to your dough is the main way to control fermentation time. The more yeast you add the faster the fermentation, and the less yeast you add, the slower the fermentation.
You also want to create a good environment for your yeast. Just like a pet, it needs food and good living conditions. You wouldn’t leave your dog outside in the cold or in the car on a hot summer day without proper food, would you? The same goes for yeast. It needs good flour to eat and the right temperature, not too hot and not too cold, not too wet or too dry.
It’s worth mentioning that you need very small quantities of yeast in Neapolitan pizza dough to get an 8-24-hour rise. Typically in the 0.2-1g range. And that’s almost impossible to measure without a proper scale with an accuracy of 0.1 or 0.01 grams.
Types of yeast for Neapolitan pizza
There are three types of yeast you can use for Neapolitan pizza:
- Fresh yeast/cake yeast (CY)
- Active dry yeast (ADY)
- Instant dry yeast (IDY)
The most traditional choice is fresh brewer’s yeast. This is also what’s most common in pizzerias in Naples. And for a long time, the AVPN only allowed the use of fresh yeast for Neapolitan pizza. Some people argue that it gives a richer and better flavor to the dough. But fresh yeast is often sold in larger quantities and doesn’t last very long. So it’s not the best option for casual pizza bakers.
Both instant and active dry yeast are basically dried versions of fresh yeast. And even though you previously had to reactivate active dry yeast in warm water, it’s not necessary nowadays. Making the use of both types pretty similar. You can dissolve both in water, just like fresh yeast. Dry yeast also has a much longer shelf-life and you can store it in the pantry for up to 12 months. It’s, therefore, the most convenient option. Dry yeast is more concentrated than fresh yeast, so you, need less yeast for the same amount of rising.
10g of cake yeast is roughly 4g of active dry yeast and 3g of instant dry yeast.
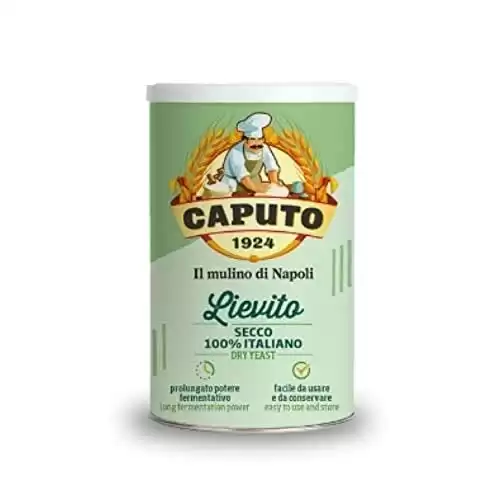
I use Caputo Lievito most of the time, mainly because of the convenience of the long shelf-life. It also lasts long, and you can easily get 1000 Neapolitan pizzas out of one can.
Fermentation for flavor
Fermentation is the magical process where yeast turns flour into flavor. And to understand and controlling this process is essential to making Neapolitan pizza dough.
The whole purpose of the long fermentation time is to develop flavor and improve the consistency of the dough.
The two main reasons for a long slow fermentation are:
- Flavor development
- Gluten development
In addition to kneading, gluten also develops over time. That means when you leave the dough to rise the gluten network will grow stronger over time. This will make an elastic dough that keeps its shape, holds better onto the CO2 produced by the yeast, and is easier to stretch without tearing.
There are many ways to improve flavor. For example, an extended rise using cold fermentation. There are also pre-ferments, such as poolish, biga, or sourdough starters. But the key is time!
Bulk vs. ball fermentation
The fermentation process is split into two phases: ball and bulk fermentation.
The purpose of bulk fermentation is to give the yeast a headstart and to start flavor development.
The main purpose of ball fermentation is to redistribute the yeast and relax the dough to make it softer and more extensible, so it’s easier to stretch and shape the pizza skins. In addition to further maturing and flavor development. The dough should rise for 6-12 hours. If you leave them shorter the dough is going to be more elastic and harder to stretch, while if you leave it longer it’s going to be softer and can easily get too thin during stretching.
Baking Neapolitan pizza
Neapolitan pizza has to be baked in less than 90 seconds. The extremely hot temperature and short baking time are the only ways you can get the right crust consistency: crunchy on the outside, yet light and soft on the inside.
You simply can’t replicate this in a home oven. It doesn’t get hot enough. Don’t get me wrong, you can make really great pizza in a home oven, especially with a pizza steel, but it will not be quite Neapolitan pizza.
According to the AVPN regulations, Neapolitan pizza must exclusively be baked in a wood-fired oven at 905°F (485°C). The pizza must also be placed directly on an oven floor at around 800°F (430°C). But you can get a very similar result with a smaller, portable
Personally, I use an Ooni Koda 16
So if you want to make Neapolitan pizza without an expensive wood-fired oven, the Ooni Koda 16 is what you’re looking for.

If you make a purchease through this link, we earn a small commission at no additional cost to you.
The pizza-making process
Okay, let’s make some pizza. This is a more detailed description of the instructions at the beginning of the article.
The pizza-making process consists of 8 steps:
- Mixing the dough
- Knead the dough
- Bulk fermentation
- Balling
- Ball fermentation
- Stretching
- Topping
- Baking
Each step builds on the previous, so if you screw up once, you’ll screw up all the consecutive steps and probably not end up with great pizza.
Making Neapolitan pizza requires a little bit of planning since it takes 24 hours from start to finish.
The first step is making the dough. And you should start the process 24 hours before you plan to have pizza. Then balling and ball fermentation should happen around 10 hours before pizza time. Then finally the stretching and baking.
An example:
I typically make the dough right after dinner (6 pm the night before), then do the balling in the morning before I go to work (around 8 am), then prepare and bake pizza at 6 pm.
Slight adjustments (longer bulk, or longer ball fermentation) are okay to fit your schedule. Just experiment. You can also adjust the yeast for a shorter or longer total fermentation time if needed. E.g. 18 hours or 27 hours.
1. Mixing the dough
You want to start with cool water in a bowl (around 65°F/18°C) to ensure the dough doesn’t get too hot when you’re done mixing and kneading.
The reason why we start with the water, and not flour, like most recipes, is that it’s much harder to add extra water later if the dough ends up too dry.
Traditionally, the dough is mixed just using your hands, but you can also use a wooden spoon or another kitchen tool. But using your hand will give you a better feel for the dough with some experience
The next step is to add the salt and dissolve it in the water. Pour in the salt, and mix until it is completely dissolved.
Proceed by adding around 10% of the flour while incorporating it with the water. Try to get a smooth consistency without any lumps. Next, you can add your yeast, and dissolve it. The reason you add some flour before the yeast is that you don’t want the salt concentration to be too high when adding the yeast because yeast doesn’t like salt. And too high concentrations of salt can kill the yeast. Therefore, you want to dilute the salty water before you add the yeast.
Continue adding flour while mixing until it’s all incorporated and you’re left with a cohesive dough.
2. Kneading
Next, transfer the dough to a working surface, and start kneading. A stand mixer with a dough hook at low speed can be used, but I recommend just kneading by hand to get a better feel for the dough.
There are many ways of kneading pizza dough, but the goals are:
- Developing gluten
- Incorporate air into the dough
It’s a good idea to fold the dough over itself when you knead, to incorporate air.
Continue kneading the dough for 20-30 minutes, until the dough gets fairly smooth. You can check if the dough is done by lightly pressing the dough down with one finger. If it’s ready, the dough should spring back. You can also perform the “windowpane test”. Take a small piece of dough and check if you can stretch it so thin that you can see light through it without ripping a hole in the dough.
Let the dough rest for 10-20 minutes. Then, fold a couple of times to create a nice and smooth dough ball. The dough is now ready for fermentation.
3. Bulk fermentation
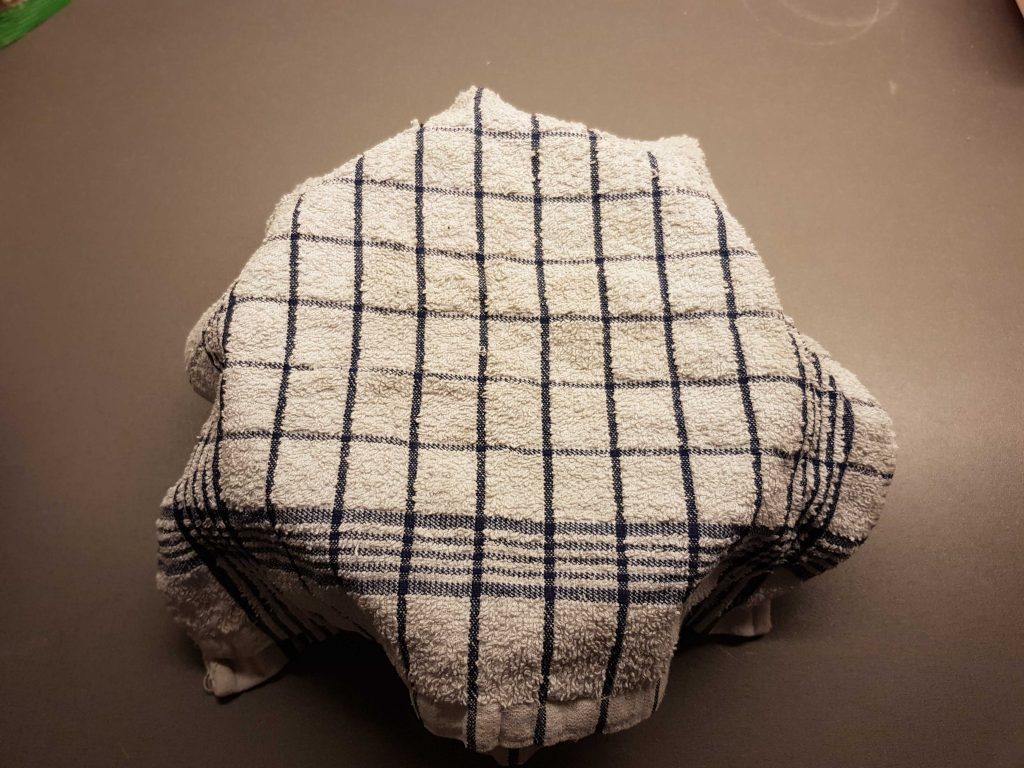
Place the dough in an air-tight container or a bowl covered in plastic wrap to prevent the surface from drying out. You don’t need to add any flour or oil to the dough or container, the dough shouldn’t stick much (since it’s fairly low in hydration).
Let the dough rise for around 14 hours (overnight) at room temperature.
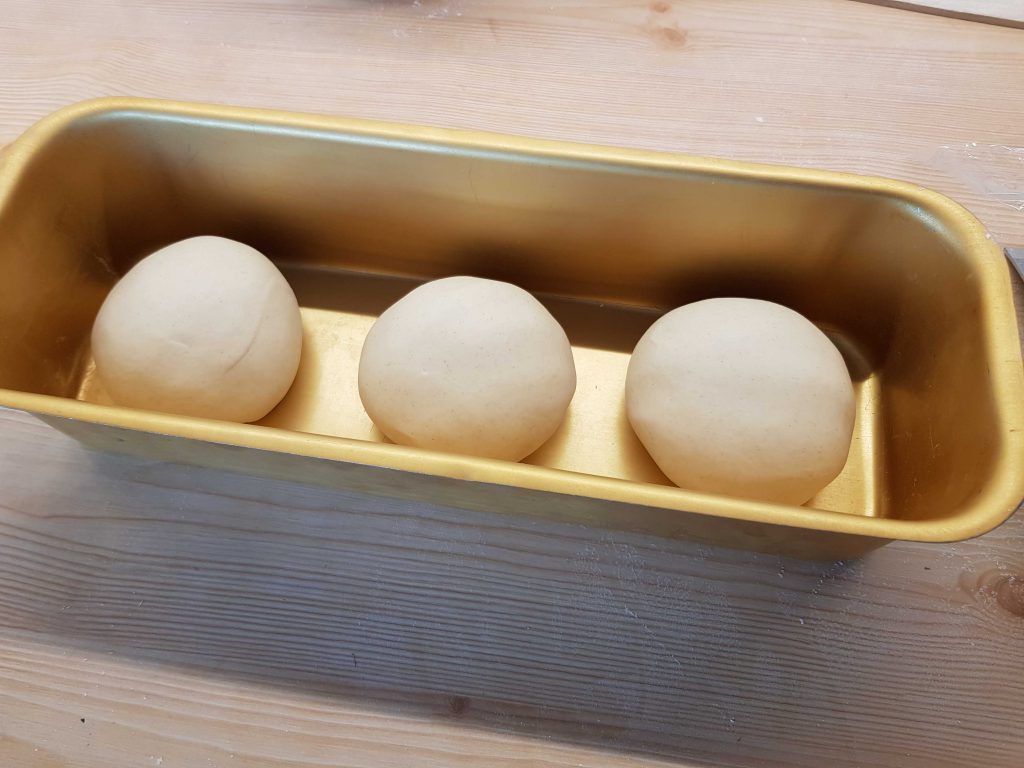
4. Balling
Time for balling!
Balling simply means cutting the larger dough into smaller, pizza-size dough balls. This will redistribute the yeast for further fermentation and make sure the dough balls are properly relaxed so they get extensible and easy to stretch when it comes time for preparing the pizzas.
Spit the dough into 250g (9 oz) balls. 250g dough balls make 11-12 inch Neapolitan pizzas. This can be done using a dough scraper or simply ripping off a piece of dough. I also recommend using a scale to weigh the dough balls.
Then, fold them over a few times (this stresses the gluten, so the dough balls don’t get too relaxed) and try to make round nice dough balls. A round pizza starts with a round dough ball.

5. Ball fermentation (2nd leave)
When all the dough balls are made, place the dough balls in a rising box lightly dusted with flour. You don’t want the dough balls to be too close, since they will flatten and spread out during the second leave.
Then cover the dough box with a lid and let the dough balls ferment for around 10 hours at room temperature.
After 10 hours, the dough balls should have increased in volume, 1.5-1.8 times, and flattened out and spread. They are now ready to make pizza!
Open and stretch the pizza
Start by preparing a small pile of flour on your working surface.
Then take the pizza out from the rising box using a dough scraper or pizza spatula. Using some extra flour will help prevent sticking.
Place the dough ball in the flour you prepared and cover the dough ball so they are not sticky. Shake off excess flour and move the dough to a clean working surface.
Make sure the dough ball is round (it can get out of shape when removed from the rising container) and start by pressing the air from the center of the dough to the edges using flat hands, pressing with the fingers and palms. You want to leave 1/2 inch (1cm) of the rim untouched. This will puff up in the oven and create a that nice, crunchy, and soft edge.
Rotate and turn it over a few times, until you have a round, flat pizza base.
Then hold the pizza in one hand and gently stretch using the other hand, rotate the pizza ⅓ and continue until the pizza is 10-11 inches (25-27 cm) in diameter (80% of the final size of the pizza).
Lastly, finish off by getting rid of any flour that might be left on the dough. You don’t want the flour to burn in the hot oven.
The shaping of the pizza is better illustrated visually, I have therefore included a YouTube video of master pizzaiolo Enzo Coccia that illustrates the traditional Neapolitan slapping technique (“lo schiaffo”).
(Make sure to turn on subtitles if you don’t speak Italian)
Topping the pizza
Topping the pizza is a simple 3-step process:
- Sauce
- Cheese
- Other toppings
So start by adding around 80g of Neapolitan pizza sauce. Then, add mozzarella. And lastly other toppings of your choice. If you want to go traditional, check out the Pizza Margherita recipe here.
Tip: top the pizza right before you are going to bake it. If you leave it too long on the countertop, it may stick and be hard to get onto the
Baking Neapolitan pizza
Before even starting to prepare your pizza, you have to preheat your oven. It should be around 905°F (485°C), and the floor around 800°F (430°C).
The time it takes to preheat the oven depends on the type of oven you’re using, the size, and the fuel source. A wood-fired oven can take a few hours to come to temperature, while a small gas oven can get hot in less than 30 minutes.
An Infrared thermometer to check the temperature
The easiest way to check the temperature is to use an infrared thermometer. This can give you an instant, accurate read from a distance (without burning your fingers!).

An easy-to-use laser thermometer gun that can read temperatures from -58°F to 1472°F to ensure the right baking temperatures for perfect pizza every time.
You can read more about infrared thermometers and how to use them here.
Pizza peel
In addition to an oven, you also need a
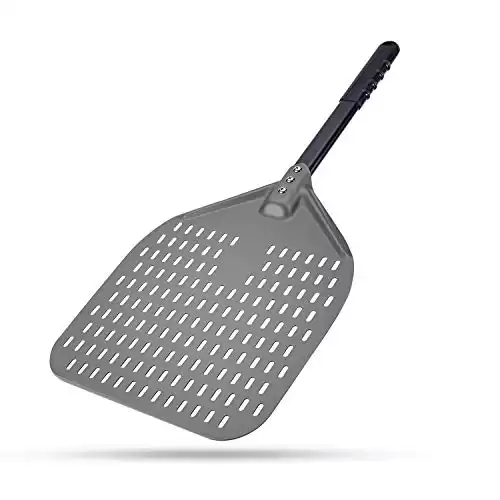
This lightweight premium, anodized aluminum peel features a balanced 12x14-inch blade for effortless handling and a perforated surface to reduce sticking.
Read more about perforated pizza peels here, and why they are the best all-around peels.
The bake
The first thing you need to do is move the pizza from your working surface into the peel. This is easier if you have a friend who can help you hold the peel.
First, make sure the pizza is not stuck to the working surface. Then, hold the peel at a slight angle and simply drag the pizza over to the peel. Stretch out the pizza to its full size of 11-12 inches (remember we only stretched it to 80% during the initial shaping, since if it’s too thin it’s harder to transfer it over to the peel and it may rip) and to the final shaping of the pizza.
Move the peel over to the oven, and slide the pizza off, onto the hot floor of the oven.
Let the pizza set for 15-30 seconds. If you try to touch it before it sets, it will probably stick to the floor and may rip and make a mess. You will see the crust puff up and get tall and start browning. At this point, you want to turn the pizza to make sure it gets an even bake and doesn’t burn. The best tool for this job is a pizza turning peel. A regular
Also, check the bottom of the pizza. You don’t want that to burn either. If the bottom finishes before the top of the pizza, you can simply finish the pizza by “doming”: lifting the pizza up closer to the dome where it’s hotter.
When the pizza is done baking. This should not take more than 90 seconds. Remove it from the oven using the
Authentic Neapolitan Pizza Dough Recipe
Equipment
- Mixing bowl
- Kitchen scale
- Pizza oven or pizza stone
- Pizza Peel
Ingredients
- 922 g tipo 00 pizza flour
- 553 ml water cool
- 23 g sea salt fine
- 1 g Fresh yeast
Instructions
- Add water to a mixing bowl and dissolve the salt.
- Add 10% of the flour while mixing with your hands or a wooden spoon.
- When you have a smooth, batter-like consistency add the yeast and dissolve it (you don’t want the yeast to be in direct contact with salt, as this may damage it).
- Gradually add the rest of the flour while mixing, until you end up with one, single mass.
- Move the dough out of the mixing bowl to the countertop, and start kneading. Knead the dough by hand for 15-20 minutes, or in a stand mixer at low speed for 10-15 minutes, until you get a pretty smooth dough. The goal is to develop gluten and incorporate air into the dough.
- Leave the dough covered to rest for 15-30 minutes.
- Fold the dough over itself a few times and form a smooth, round dough.
- Place the dough in an airtight container, or in a bowl covered in plastic wrap, and let it rise for around 14 hours.
- After 14 hours, take out the dough, and cut it into dough balls of 250 grams each. Make sure the dough balls are smooth and even to get round, nice pizzas.
- Place the dough balls in a lightly floured proofing box and let them rise for another 10 hour. If you don’t have a pizza proofing box, you can place the dough balls individual bowls with lid or covered in plastic wrap instead.
- Preheat your oven. If you use a wood-fired pizza oven, preheat it until the floor of the oven is around 850°F (430°C) and the ceiling is around 900°F (480°C). If you use a home oven, place a pizza stone or steel in the oven and preheat on the hottest setting for at least 1 hour.
- Take out one dough ball from the rising box
- Place the dough ball in a small pile of flour and press it gently from the center using the palm of your hands. Make sure to leave around 1/2 inch (1cm) around the edge of the dough to form the crust. Then stretch it into a 10-11 inch (25-27cm) round disc.
- Get rid of any excess flour from the dough and place it on a clean part of your countertop
- Add 60-80g of Neapolitan pizza sauce in the center of the disc, and spread it evenly with the back of a spoon using circular motion.
- Add cheese and other toppings.
- Slide the pizza onto your pizza peel and quickly transfer it into the oven. You want to work quickly to prevent the pizza from sticking to the countertop or the peel.
- Bake the pizza for 60-90 seconds in a pizza oven, and make sure to turn it to get an even bake. In a home oven, bake the pizza for 4-8 minutes on a pizza stone or steel, depending on how hot your oven is. And if you have a grill function or broiler, turn it on during baking for an even hotter bake. That’s going to get you pretty close to the heat of a pizza oven!
- Using the pizza peel, remove the pizza from the oven, transfer it to a serving plate and serve immediately. Neapolitan pizza should be eaten right from the oven!
Related


- Ooni Turning Peel Review: The Best Peel for Home - April 15, 2024
- Gi.Metal Turning Peel Review: Is This the Ultimate Pizza Tool? - April 14, 2024
- Discover Pizza Mastunicola: The Story of the First Pizza - April 7, 2024
This is one of the most detailed neapolitan pizza recipes I have found. Exactly what I was looking for!
I’m want to learn more please.thanks somuch.
Turned out great. Thank you!
I have read about the importance of the “W” rating of the flour, but most times this information is not written on the Flour packaging. So how can you determine the “W” Rating of the flour?
Unfortunately, the strength (“W”) is rarely written on the package and can be hard to find. For Caputo flours, you can find the W-ratings on their website: https://www.mulinocaputo.it/en/flour.
I’m really into Neapolitan pizza, and this recipe was so helpful! My husband recently got the family a Ooni oven so I’ve been looking all over the internet for a good Neapolitan pizza recipe to try out in the new oven. And I’ve now tried this a couple of times and it turned out amazing! Surely best pizza in town!
Turned out good!
– Tony
Hello, I was wondering about the amount of yeast needed for the recipe. Near the top of the post its says 1g fresh yeast, but on the recipe on the bottom it says 3g fresh yeast. So I am a little confused on how much to add. Also how much yeast would you need to add if you were to use active dry yeast?
It should be 1 gram, the mistake in the summary at the bottom is fixed now.
1g of fresh yeast (cake yeast) is roughly 0.45g active dry yeast and 0.3g instant dry yeast.
The top recipe calls for 1g of fresh yeast while the bottom recipe calls for 3g of fresh yeast. Which is the preferred amounts of fresh and dry yeast based on the rising times provided in the recipe?
Hi, it should be 1g of fresh yeast (cake yeast). The recipe summary at the bottom had a typo, but I’ve fixed it now. Thank you for letting me know!
Amazing
Thanks for all these details , but i have one inquiry about rising pizza in summer with 30 c , do i keep the dough outside or in fridge and if in fridge could you tell me how many hours then inside then outside
Hi, 30 degrees C is pretty hot. Especially for a 24-hour rise. But as you suggest, what you can do to make a 24-hour dough is to do part of the rising outside (30C) and the other part in the fridge (3-4C) to slow down the yeast.
I suggest letting the dough rise at room temperature for 3-4 hours in bulk, making dough balls, then letting them rise in the fridge for around 18 hours, and pulling them out to let the dough balls come back to the temperature around 2 hours before baking.
Exactly what I was looking for!
Robert
Hey,
I read your article and i have to say, that was amazing!
But I have some questions about the recipe.
First I don’t understand what’s the difference between biga and the other pre-ferments and i’ll be happy if you could explain this to me.
Secondly at my current home the weather is pretty hot, around 37 c and i’m not sure if it’s ok to leave the dough to ferments overnight, so it doesn’t get spoiled.
Thank you, Ilay.
Hey,
I read your article and i have to say, that was amazing!
But I have some questions about the recipe.
First I don’t understand what’s the difference between biga and the other pre-ferments and i’ll be happy if you could explain this to me.
Secondly at my current home the weather is pretty hot, around 37 c and i’m not sure if it’s ok to leave the dough to ferments overnight, so it doesn’t get spoiled.
Also i wanna know if i should sift the flour before the using.
Thank you, Ilay.
Hi Andreas
I have only Caputo Dopio Zero Classic (W 220/240) and Cuoco (W 300/320] available. Cann I mix it e.g. 2/3 Dopio and 1/3 Cuoco to have a similar strength as the Caputo Pizzeria have?
THX and kind regards
Stephan
Working with Bakers percentage – what is correct amount of Salt in the recipe here?
3% (27.7g) or 23g (25%)
Thank you and kind regards
Best bakers percentage scale? Top quality? PS….love your site.
Are you asking about the best kitchen scale for pizza baking?
I’m using the scale I recommend in this article: Best scale for pizza baking
But the most important part is that the scale is precise. Especially when measuring yeast. It’s also important to be able to measure larger quantities of flour, for example. So I love the 2-platform scales where one side has an accuracy of 1g (and it can handle 3-5 kg), and the other side has an accuracy of 0.01g.
Hello, new to pizza dough making here. I followed your recipe and my pizza turned out good, however, I got stumped at the dry active yeast part. Do you following the instructions on yeast packet to activate it first, or do you just add the yeast granules to this recipe? And also, I am still confused about how many grams of dry active yeast to use. Is it .28 grams or something else? I appreciate all your advice! Thank you!
I see you use a koda 16 too.
When launching your pizza, are you lowering the power to minimum like most people do?
I’m usually lowering it to around medium.
Simply amazing! I have made this pizza a few times, and the entire family love it. We will not be ordering pizza anymore when we can make better at home. Thank you! 5/5
If using Caputo Active dry yeast which doesn’t need to be activated so it is really like instant dry yeast which amount should I use? Would I use 0.45g active dry yeast or 0.3g instant dry yeast?
I find Caputo Lievito dry yeast to be closest to Active Dry Yeast in potency, evnen though you don’t need to rehydrate it. So stick to Active Dry Yeast.
I’m just letting my dough sit now but I’m a bit worried. I only wanted to make enough for 2 pizzas so I divided everything by 3.
The amount of yeast (instant) was so low (.09g) that I could barely measure it. So I just chucked in the tip of a knife’s worth.
I’ll let you know how it goes but it seems a bit low haha.
Will report back!
Ben,
How did this turn out for you? I’m making this recipe currently and I measured to .09g like you did, and my dough has practically no activity after the first 14hr ferment…
Confusing indeed, let me know how your knife tip worked out!
The resting time is at room temperature or fridge?
Room temperature