Do you love Neapolitan pizza but can’t get enough of the light, fluffy, and delicious crust? Then you’ve come to the right place! Canotto pizza is a take on the Neapolitan pizza with an even taller, lighter, and better crust. Not only does it look spectacular, but you’re in for a real treat! Baking canotto pizza is easy, and this article will explain everything you need to make the perfect pie. So, get ready to impress your friends and family!
Jump to the recipe summaryWhat is Canotto Pizza?
Canotto pizza, or Pizza Canotto, is a twist on the classic Neapolitan pizza with a taller and lighter crust. The name “Canotto” means “inflatable boat” (dinghy) in Italian and refers to the appearance of the tall rim of the pizza.
Canotto pizza is often made using a preferment, like poolish or biga, and often has a higher hydration dough than classic Neapolitan pizza. When it’s baked in a hot oven, the edge puffs up to create the tall, signature boat-like rim.
My own Neapolitan pizzas have always leaned towards the canotto style, even before I knew the name. Since Canotto pizza is made using pre-ferments in addition to a long and slow fermentation, the taste of the crust is out of this world. And there’s just something special about the incredibly light and soft interior of the crust.
The secret to the perfect Canotto pizza crust
A good Canotto Pizza is about the crust. You don’t want a thick, doughy crust, but a light and open one. It should be crispy on the outside, yet light and soft on the inside. To achieve this, you need the right dough.
To achieve the perfect crust you need an extensible (stretchy) dough with many small air bubbles that can expand and inflate the crust when baking your pizza.
The 4 keys to the perfect Canotto crust are:
- High hydration makes the dough more extensible and gives it a better oven spring
- Use a pre-ferment to improve the oven spring, crust consistency, and flavor
- The right amount of gluten development
- Let the dough relax before stretching to let it expand even more during baking
High hydration
For Canotto Pizza dough, you’ll need higher hydration (more water compared to flour) than a traditional Neapolitan pizza. And 70% is a great starting point. The additional water will make the dough more extensible and allow more oven spring, resulting in a taller, airier crust.
Pre-ferment
To make the dough even more extensible, and to add extra flavor (who doesn’t want better tasting pizza?), you can use a pre-ferment.
A pre-ferment is an additional step, where you make a starter before the main dough. The purpose of this extra step is to make your final dough more extensible (stretchy) allowing more oven spring and larger bubbles in the crust – exactly what we want from our Canotto Pizza!
The easiest pre-ferment to you can make is a poolish. A poolish is made from equal parts flour and water, plus a small pinch of yeast. When you let the poolish rest, gluten starts to develop, and the yeast kicks off the fermentation process that will give your crust stronger and more complex flavors.
You can make canotto pizza without using a pre-ferment, but the 2 minutes it takes to mix the poolish is well worth it, both for the flavor and consistency of your crust!
The right gluten development
When making Canotto Pizza, don’t overwork your dough. If the gluten is too tight, the crust will puff up less in the oven and not make a nice and airy crust. But you also don’t want the gluten to be underdeveloped, since your dough will need some structure to form that puffy edge.
Let your dough relax
To puff up when your pizza hits the hot oven, the gluten needs to be relaxed. Tight gluten will not stretch and form large air bubbles. It’s therefore crucial to let your dough balls get enough time to relax before stretching and baking your pizza.
Give the dough balls at least 8 hours to fully relax at room temperature before stretching.
Your dough should be at room temperature when baking your pizza, since colder temperatures will make the gluten tenser, resulting in a denser crust.
It’s also important to mention that you need to be careful when you stretch your pizza. You want to preserve the lovely, small air bubbles in the rim so they puff up in the oven and turn your crust into an inflatable boat!
Ingredients for Canotto Pizza
High-quality ingredients are essential for the perfect Canotto Pizza. It’s a delicate pizza packed with flavors. To achieve the characteristic rim, you need the right gluten development, so using the appropriate flour is crucial.
This recipe makes six 10-12 inch (25-30 cm) conotto pizzas. But feel free to scale it!
- 900g pizza flour
- 630g water (70%)
- 22.5g salt (2.5%)
- 0.9g dry yeast (0.1%)
The best flour for poolish
When making pizza with poolish you need flour that can handle a long, slow fermentation. First, the poolish will rest for 14-18 hours, followed by another 10 hours for the final dough.
For a 24-hour poolish pizza, you want flour with a gluten content of around 12-13% and a strength of W260-300. That will ensure proper gluten development and that your dough will be able to withstand the long fermentation time.
My go-to flour for Neapolitan pizza is Caputo Pizzeria, a premium Tipo 00 flour from Naples, designed specifically for baking at high temperatures. So unlike most other flours, it doesn’t burn as fast in a hot

Bread flour is also a good alternative to pizza flour.
Read more about pizza flour for Neapolitan pizza here.
Yeast for Canotto Pizza
You can use any kind of yeast to make Canotto Pizza. I use active dry yeast (Caputo Levieto, affiliate link) for convenience. But if you want to use another type of yeast follow the conversion table below:
| Type of yeast | Weight | Volume |
| Active dry yeast | 0.9g | ~0.3 tsp |
| Instant dry yeast | 0.6g | ~0.2 tsp |
| Fresh yeast (cake yeast) | 1.8g | ~0.6 tsp |

Toppings for Canotto pizza
You usually top Canotto Pizza with similar toppings to a Neapolitan pizza. Fresh, high-quality ingredients that highlight the incredible crust.
Feel free to experiment with your favorite toppings, but as with any Neapolitan pizza, the secret to success is to pick a few well-balanced toppings. More is less!
Here is more inspiration for delicious pizza topping combinations.
Equipment you need to make Canotto Pizza at home
To make the perfect Canotto Pizza, you need a few essential pieces of equipment:
- Kitchen scale
- Pizza oven (or
pizza steel for home oven) - Pizza peel
- Proofing box (or rising containers)
- Dough scraper (optional)
- Stand mixer with a dough attachment (optional, but it will make it easier)
You can’t make consistent pizza without a kitchen scale. Measuring ingredients accurately is crucial, especially the yeast.
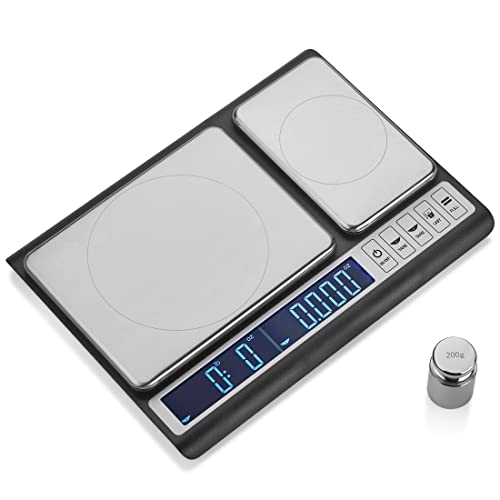
An accurate kitchen scale with two platforms that can measure up to 10kg at only 0.01g. Perfect for measuring both pizza flour and yeast
When working with poolish, I highly recommend using a stand mixer to make the main dough. The poolish is sticky and hard to mix with the remaining ingredients, so using a stand mixer to combine it all is going to make the process easier.
When handling high-hydration dough and wet poolish, a dough scraper is a useful tool.
A proofing box is convenient when making multiple pizzas. It’s not strictly necessary, but it will make it easier. Alternatively, you can use individual bowls or air-tight containers with lids to leave your pizza dough balls to rise.
To transfer your pizza in and out of the hot oven, you’re going to need a
Baking Canotto Pizza
You’ll also need a
You don’t need a huge, expensive wood-fired oven to make amazing Canotto Pizza at home. An Ooni pizza oven can reach the same temperatures and make just as good pizza! It’s also cheaper to use and easier to handle than a wood-fired oven. So at a fraction of the cost, it allows anyone to make the perfect pizza at home!

If you make a purchease through this link, we earn a small commission at no additional cost to you.
If you don’t have a
The process of making Canotto Pizza dough
Making Canotto Pizza dough is a 3-step process:
- Making the poolish
- Mixing the main dough
- Creating dough balls
Start by making the poolish the day before you plan to have pizza. The next morning, combine the poolish with the remaining ingredients to form the main dough. Let it rest a couple of hours before you split your dough into individual pizza dough balls and let them rest until pizza time.
So if you want pizza at 6 pm:
- you make the poolish around 6 pm the day before
- mix the main dough around 8 a.m. on pizza day
- make dough balls at 10 a.m.
- Prepare and bake your pizza at 6 pm
If this doesn’t fit your schedule, you can use the fridge to slow down the fermentation. Just make sure the dough balls are at room temperature when you’re making pizza.
Making the poolish
Start by making the poolish.
Ingredients for the poolish
- 450g flour
- 450g water
- 0.2g yeast
Weigh the ingredients using a kitchen scale. Next, pour room-temperature water into a mixing bowl or container, sprinkle the yeast and gradually add the flour while stirring with a spoon until all the flour is fully incorporated. Make sure there are no dry spots in the poolish. It should be pretty runny at this point
Cover the bowl or container with a lid or plastic wrap and leave to ferment for 14-18 hours at room temperature (72°F / 22°C). .
Making the dough step-by-step
After 14-18 hours the poolish is ready. It should be bubbly and smell like fermentation (kinda funky! But trust me, it will turn into amazing pizza). Let’s make the main dough by combining the poolish with the remaining ingredients.
Ingredients for the main dough
- 450g flour
- 180g water
- 23g salt
- 0.7g yeast
1. Transfer the poolish your mixer
Move the poolish from the container to your stand mixer with a dough hook attachment. Use a dough scraper to make sure you get out every single piece of your lovely poolish.
(this can be done by hand, but it’s going to be much easier using a stand mixer)
2. Add the remaining water, flour, and yeast and knead the dough
Dissolve the yeast in the water and pour the mix into the stand mixer. Turn on your stand mixer on low speed and let it run for a minute until the water and poolish are combined. Then, gradually add the flour until everything is well combined.
Turn up the speed to medium-high and let it go for 10 minutes.
3. Add the salt
A couple of minutes before the dough is done, add the salt.
The reason you add the salt last is that it will affect gluten development, creating a stronger and tighter gluten network that will be even tougher for your stand mixer. Read more about how salt affects Neapolitan pizza here.
4. Let the dough rest for 15 minutes
Leave the dough to rest for 15-30 minutes. This will relax the gluten, making the dough more extensible and pliable. Then fold it up to a nice, round ball.
5. Bulk fermentation for 2 hours
Place the dough in a rising container or bowl covered in plastic wrap, and leave to ferment in bulk for 2 hours at room temperature (72°F / 22°C).
6. Divide the dough into 6 dough balls
Take the dough out from the rising container, and divide it into 6 dough balls of 250g. Each dough ball will create one, Canotto Pizza.
7. Ball fermentation for 8 hours
Place the dough balls in a proofing box, or individual, air-tight containers, and leave to ferment for another 8 hours at room temperature (72°F / 22°C).
Stretching and topping Canotto Pizza
The key to a successful Canotto Pizza is in the shaping of the pizza. That’s where it differs from a classic Neapolitan pizza. So let’s dive into the art of shaping canotto pizza.
Start by preparing a pile of flour on your countertop or a plate (to make less of a mess). You can use the same flour you used for the dough or even better semolina flour.
Take out one pizza dough ball from your proofing box, and carefully move it to the file of flour. You want to be extra careful with the edges of the pizza so you don’t press out any of the precious tiny bubbles inside that will create the cannot edge.
Gently press the center of the dough using the tips of your fingers, turn the dough, and repeat on the other side. Make sure the entire surface of the pizza is covered in flour so it doesn’t stick to the countertop or your hands.
Move the pizza to the countertop and keep pressing the center until you have a flat, even base. Just make sure to leave a rim of around 1 inch (2.5 cm) of edge.
Continue by carefully stretching the dough, rotate, and repeat until the pizza reaches around 8-9 inches in diameter (80% of the final size).
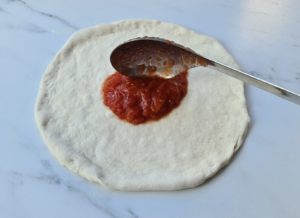
Finally, add tomato sauce, cheese, and your favorite pizza toppings. Just make sure to leave the rim alone!
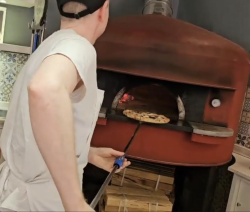
Baking Canotto Pizza
Preheat your
Carefully move the topped pizza to your
Let the pizza sit for at least 15-30 seconds If you try to move it before it sets you run the risk of ripping a hole in the bottom. The crust puffs up and starts to brown, and you probably need to rotate the pizza to make sure you get an even bake.
The pizza should be done in around 90 seconds, but keep an eye on both the crust and the bottom of the pizza. When it’s done, take it out of the oven using a

Perfect Canotto Pizza recipe
Equipment
- Kitchen scale
- Pizza Peel
- pizza oven or pizza steel
- proofing box or air-tight containers
- dough scraper optional
- stand mixer optional, but reccomended
Ingredients
Ingredients for the poolish
- 450 g pizza flour
- 450 g room temperature water
- 0.2 g active dry yeast
Ingredients for the main dough
- 450 g pizza flour
- 180 g room temperature water
- 22.5 g fine sea salt
- 0.7 g active dry yeast
Instructions
Poolish
- Pour water into a mixing bowl, dissolve the yeast and gradually add the flour while mixing .
- Cover the bowl and leave it to ferment for 14-18 hours at room temperature.
Main dough
- Transfer the poolish to a stand mixer together with the water and yeast and let it run at the lowest setting for a minute. Then, gradually add the flour until it's well combined.
- When the flour is fully incorporated, turn up the mixer to medium-high and let it run for 10 minutes.
- A couple of minutes before the dough is done, add the salt.
- Let the dough rest for 15-30 minutes to make it more extensible and pliable. Then fold it up into a nice, round ball.
- Place the dough in a rising container or bowl covered in plastic wrap, and leave to ferment in bulk for 2 hours at room temperature.
- Take the dough out from the rising container, and divide it into 6 dough balls of 250g. Each dough ball will create one, canotto pizza.
- Place the dough balls in a proofing box, or in individual, air-tight containers, and leave to ferment for another 8 hours at room temperature.
Stretching and topping
- Prepare a small pile of flour, then take out one dough ball and carefully move it to the file of flour.
- Gently press the center of the dough using the tips of your fingers, turn the dough, and repeat on the other side. Make sure the entire surface of the pizza is covered in flour so it doesn’t stick to the countertop or your hands.
- Move the pizza to the countertop and keep pressing the center until you have a flat, even base. Just make sure to leave a rim of around 1 inch (2.5 cm) of edge.
- Continue by carefully stretching the dough, rotate, and repeat until the pizza reaches around 8-9 inches in diameter (80% of the final size).
- Finally, add tomato sauce, cheese, and your favorite pizza toppings. Just make sure to leave the rim alone!
Baking
- Preheat your pizza oven to 800°F (430°C).
- Carefully move the topped pizza to your pizza peel and scratch to its full size of 10-12 inches (25-30 cm), and slide the pizza into the oven.
- Let the pizza bake for around 90 seconds, until the crust is tall and nice, and starts to brown.
Related


- Neapolitan Pizza Dough Planner - June 7, 2026
- Is Your Pizza Dough Too Dry? Here is How to fix it! - June 10, 2024
- The Ultimate Guide to the Pizza Dough Windowpane Test - June 8, 2024