Are you ready to impress your friends and family with the best Neapolitan pizza they’ve ever tried? Then you’ve come to the right place! This easy guide will give you the exact step-by-step process you need to make amazing Neapolitan pizza at home.
Making your own pizza dough can be a lot of fun, but if you’re new to pizza-making, things can go wrong along the way. I know the frustration, but I’m here to help you!
Pizza-making is an art form that can take a lifetime to master, but I believe that anyone can make amazing pizza on their first attempt with the right recipe. So let’s get our aprons ready and make some Neapolitan pizza!
What makes a good Neapolitan pizza?
Neapolitan pizza is a thin, round pizza with a raised edge. It typically measures 10-14 inches (25-35 cm) in diameter and serves one person. The crust is crispy and slightly charred, while the center is on the softer side, making it best suited for eating with a knife and fork.
Good Neapolitan pizza is all about balance. With simple, high-quality ingredients that work together to highlight the star of the show: the crust. Sauce, cheese, and toppings are more like condiments. So naturally, the dough is the most important part of a Neapolitan pizza.
Both flavor and consistency are important. Long slow fermentation is crucial for both. A fast bake in a hot oven is also important to give a light crust that’s soft and nice on the inside while crispy and charred on the outside.
It’s all about the dough!
Good dough is the secret behind every great pizza. To make a good dough, you need quality ingredients, accurate measurements, and a little patience for the flavors to develop. With these three elements, you’ll make delicious pizza dough that will impress your friends and family.
The keys to great pizza dough:
- Quality ingredients
- A long, slow fermentation
- A quick and hot bake
How to successfully make your first Neapolitan pizza
Patience is a virtue. While you may be tempted to take shortcuts, time is one of the most overlooked ingredients in pizza baking. If someone tells you that you can make great pizza in an hour, they haven’t tried real pizza!
Start with the basics
Many recipes online list a bunch of different ingredients you don’t need. Neapolitan pizza is all about simplicity and making the most out of good ingredients. All you need is 4 ingredients: flour, water, salt, and yeast. There’s a time and place for other ingredients, of course, but it’s better to start with the basics and master them before adding more complexity.
The same goes for equipment and tools. I know it can be exciting to get into a new hobby and buy all the stuff, but don’t get ahead of yourself with equipment until you’ve mastered the basics.
Baking is an art that requires precision. Adding too much or too little of an ingredient to your dough can have a huge impact on the final result. Too little yeast and the dough will not rise, too much water and the dough will be too sticky, and so on. To ensure your dough comes out perfect every time, you must measure your ingredients with a kitchen scale.
Ingredients for Neapolitan pizza dough
This recipe makes 6 Neapolitan pizzas, but you can easily scale the recipe. If this is your first time making Neapolitan pizza at home, I recommend having a few extra dough balls just in case things don’t go as planned.
What you’ll need:
- 950g pizza flour (100%)
- 620ml water (65%)
- 24g fine sea salt (2.5%)
- 9.5g active dry yeast (1%)
Plus some additional flour for dusting when stretching the pizzas.
You will also need Neapolitan pizza sauce and your favorite toppings!
Flour for Neapolitan pizza at home
The best flour for Neapolitan pizza is medium-strong Italian pizza flour with a protein content of 11-13%. All-purpose flour is not suitable for Neapolitan pizza, as it lacks the strength to stretch the dough and can cause the pizza to collapse during a long rise. The long rise is key to developing a light and crispy crust, as it helps to develop the gluten, which gives the pizza dough its texture. So for the best results, it’s important to ensure you are using the correct flour.
“When in Rome do as the Romans do“, and when you want to make Neapolitan pizza, do as the Neapolitan pizza bakers do. So get yourself a good Neapolitan pizza flour!
My go-to flour for Neapolitan pizza is Caputo Pizzeria. Caputo Pizzeria is an Italian Tipo 00 pizza flour and one of the most popular flours in Naples. It has a gluten content of 12.5%, which will make the perfect stretchy pizza dough.

Yeast for Neapolitan pizza
This recipe is based on active dry yeast. But if you want to use another type of yeast, follow the conversion table below:
| Type of yeast | Weight | Volume* |
| Active dry yeast | 9g | ~3 tsp |
| Instant dry yeast | 6g | ~1.2 tsp |
| Fresh yeast (cake yeast) | 12g | ~4 tsp |
* I don’t recommend using volume (tsp) to measure yeast.
What you need to make Neapolitan pizza at home
To make Neapolitan pizza at home you will need:
- Mixing bowl
- Kitchen scale
- Pizza peel
- Pizza stone or
pizza steel - Dough scraper (optional)
- Rising box (optional)
- Stand mixer (optional)
Mixing bowl
You’ll need a large mixing bowl to combine all your ingredients to form the dough. You can also use the mixing bowl to raise the dough later.
Kitchen scale
A kitchen scale is one of the most important tools you’ll need to make Neapolitan pizza. Measuring ingredients by weight rather than volume (cups and tablespoons) is more precise. And that is crucial for making consistent pizza dough.
So if you don’t already own a kitchen scale, it’s probably the best investment you can make to instantly make better pizza.
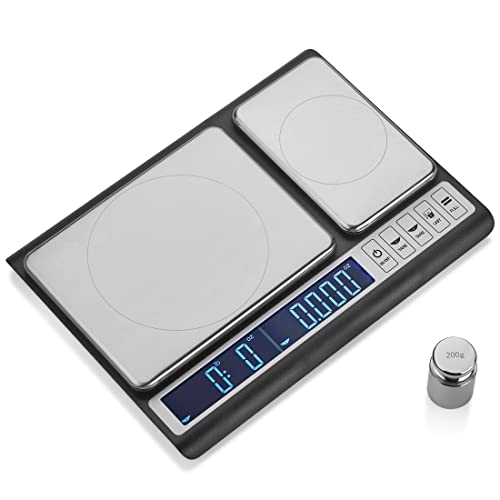
An accurate kitchen scale with two platforms that can measure up to 10kg at only 0.01g. Perfect for measuring both pizza flour and yeast
Pizza stone or pizza steel
One of the main issues with baking pizza in a home oven is the temperature. It simply doesn’t get hot enough compared to a
Both pizza stones and pizza steels are portable cooking surfaces that help to transfer heat to the pizza and cook it faster. When baking pizza directly on a hot surface, it will make the crust lighter, airier, and crispier. Just like in a professional
A Pizza stone is the most affordable option, but don’t get the cheapest one you find. These are usually of poor quality and crack easily. Instead, you should get a pizza stone made from cordierite, which is much stronger, more durable, and less prone to cracking.
Pizza steels are much more durable and transfer heat even better than pizza stones. They are also easier to clean and can last you a lifetime with proper care.
If you’re new to pizza making, a pizza stone is a good place to start, but if you’re in it for the long haul, I recommend investing in a

Pizza peel
You will also need a
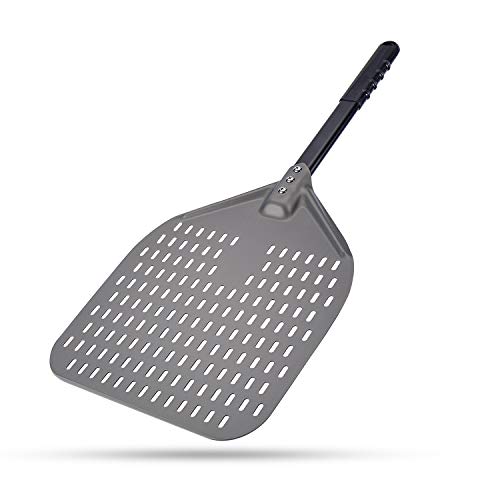
This lightweight premium, anodized aluminum peel features a balanced 12x14-inch blade for effortless handling and a perforated surface to reduce sticking.
What can go wrong?
A lot of things can go wrong when baking pizza. Pizza baking is a series of steps, and if any of these steps are done incorrectly you’ll be disappointed by the outcome. You often can’t tell that something’s off until the pizza is done. And it’s hard to backtrack to figure out where things went wrong. That’s why it’s so important to pay attention to the process and make sure that each step is done accurately. If you do, I promise you, that you’ll turn out amazing pies in no time!
How to make the perfect Neapolitan pizza at home step-by-step
Breaking the process down into smaller steps can make it less overwhelming and easier to understand, as you can focus on one step at a time. This will help you to create a delicious pizza with ease!
The pizza-making process:
- Create the dough
- Gluten development
- Bulk fermentation
- Balling
- Ball fermentation
- Opening and stretching the pizza
- Topping the pizza
- Baking the pizza
In the following sections, I will go through each step and explain how to do it and why.
1. Creating the dough
The first step is to make the pizza dough.
1.1 Prepare and measure your ingredients
Find your ingredients and kitchen scale and measure your ingredients. As already mentioned, the key to a successful Neapolitan pizza dough is to measure your ingredients accurately.
One thing worth mentioning is that you should not add any additional flour during mixing or kneading. By adding more flour you’ll alter the dough’s consistency, and end up with a denser and drier crust.
1.2 Combine the ingredients and mix the dough
Add the salt and room-temperature water to a mixing bowl, and stir to dissolve the salt.
Next, add around 10% of the flour (~100g) to your bowl, and mix with your hand or a spoon until you get most of the lumps out.
Then, add the yeast and stir until it is dissolved. Gradually add the remaining flour while mixing until it’s all combined into a shaggy dough.
Why add ingredients in this order?
The reason we start with water is that it’s easy to dissolve both salt and yeast in water. It’s also easier to hydrate the flour by gradually adding the flour to the water, rather than the other way around.
And if you’re concerned about adding the yeast directly to the salty water, that’s why we add some of the flour first. That will lower the concentration of salt. But it also takes some time before salt negatively affects the yeast, so unless you leave the yeast for 10-15 minutes, you don’t need to worry.
2. Kneading the pizza dough
The next step is to knead your pizza dough to develop strength and structure.
How to knead pizza dough
Move the dough from the mixing bowl to your countertop.
Fold the dough over itself until any loose flour is incorporated. Then stretch and fold the dough over itself until you get a smooth elastic dough. It can start out sticky, but as the gluten develops the dough will get smoother and less sticky. This process will take around 15 minutes of kneading by hand.
It’s hard to explain in words how to knead the dough properly, so have a looking at this video from King Arthur Baking:
You can also use a stand mixer with a dough hook attachment if you have one. Let it run at medium-high speed for 15-20 minutes.
How to tell when your dough is ready
You’re done kneading when the gluten has developed properly. You can check that by using The Windowpane Test.
Take a small piece of dough, and carefully stretch it out as thinly as possible. If you can stretch it thin enough for light to shine through, then the test has been passed, but if it tears, you need to knead the dough more.
Why do you need to knead pizza dough?
You need to knead your pizza dough to develop gluten.
Gluten is a collection of proteins found in wheat flour. And when the gluten absorbs water, these proteins start to form a network that holds the dough together Kneading will strengthen this gluten network and give the dough structure and prevent it from tearing when you stretch it. The gluten network also traps gasses so the crust puffs up in the oven and gets light and airy.
Kneading also makes the gluten tenser, making it harder to stretch. That’s why it’s important to let the gluten relax before you shape your pizza – more on that later!
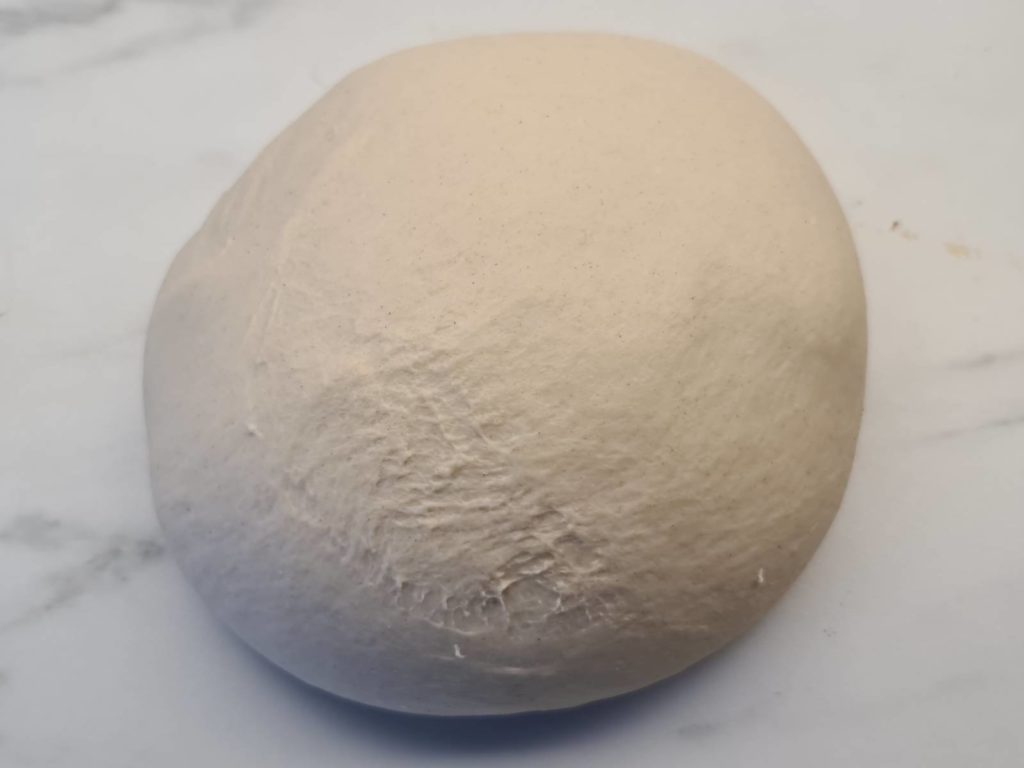
3. Bulk fermentation
Place the dough in a large mixing bowl, cover it with a damp towel or plastic wrap, and let the dough rise for 2 hours at room temperature (around 72°F / 22°C).
Bulk fermentation is the first step in the development of flavor. When you leave the dough to rise, the yeast will break down and eat carbohydrates in the flour, and as a byproduct, it will create flavor and gas which will cause the dough to rise. It’s important to not rush this process.
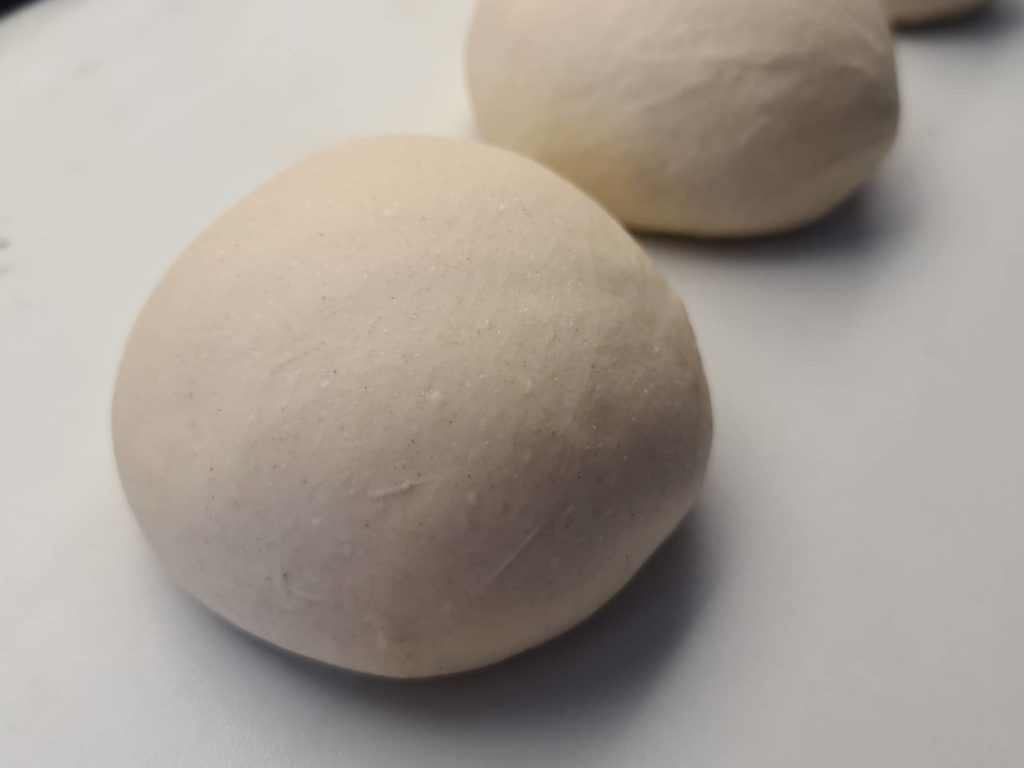
4. Portioning the pizza dough (balling)
4.1 Portion pizza dough
Roll the dough up, and split it into 6 equal portions, one for each pizza. They should come out at around 260g each. The easiest way to divide the dough is by using a dough scraper or a knife.

4.2 Make dough balls
Next, fold the individual doughs over themselves a couple of times and shape them into round, nice dough balls. Round dough balls will give a more uniform rise and round pizzas.
5. Ball fermentation
Place the dough balls on a lightly floured baking tray, cover them with a damp towel, and let them rise for 6 hours at room temperature (around 72°F / 22°C).
During this second fermentation step, the dough will continue developing. In addition to that, the gluten will relax, which is crucial to be able to stretch dough balls into delicious Neapolitan pizza pies.
After 6 hours, the dough balls should have increased by around 1.8-2 times in volume. They will probably look a bit flat at this point, but don’t worry. That just means the gluten is sufficiently relaxed and that your dough is going to be extensible and stretchy.
If you leave the dough much too longer than 6 hours, the dough will rise too much and potentially then deflate. This will give you a dense, dry crust.
6. Stretching the pizza dough
Time to stretch out the dough to get it ready for toppings.
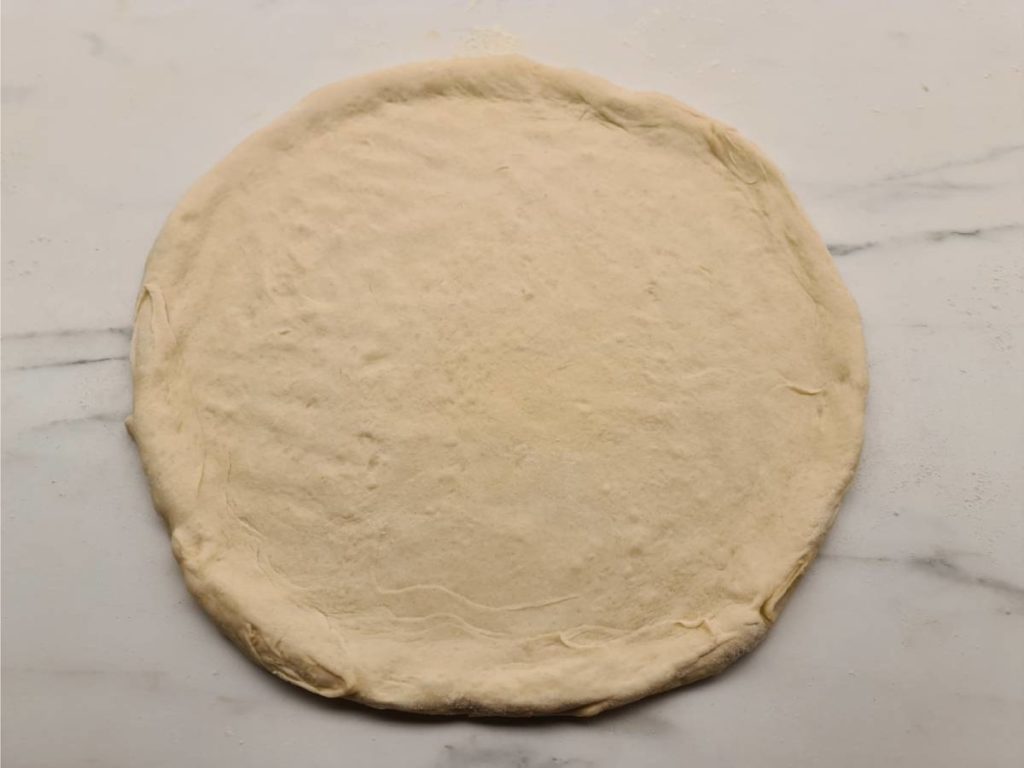
6.1 Initial shaping (opening the dough)
Start by preparing a small pile of flour on your countertop. Next, carefully lift a dough ball and place it in the flour. Turn the dough and make sure there is flour on both sides. Then, move it to a clean part of the countertop.
Press the center of the dough using the palms of your hands, to create a rim of around ½ inch (1 cm). This rim will puff up and create a nice, airy crust. It will also help keep your sauce, cheese, and toppings in place.
6.2 Stretching the dough
Next, stretch the dough out to around 10 inches (25 cm) in diameter.
Stretching Neapolitan pizza can be intimidating if it’s your first time. The traditional way of stretching is called the Neapolitan slap, but if this is your first time stretching Neapolitan pizza, just carefully press and stretch the pizza until you reach the desired size. But don’t use a rolling pin! Unless you want dense pizza crust.
Try to make the center even in thickness, without any holes. And if it doesn’t turn out perfectly round the first time, don’t worry, practice makes perfect!
When you’re happy with your pizza, give the countertop a light dusting of flour to stop your pizza from sticking to the countertop when you’re ready to pop it in the oven.
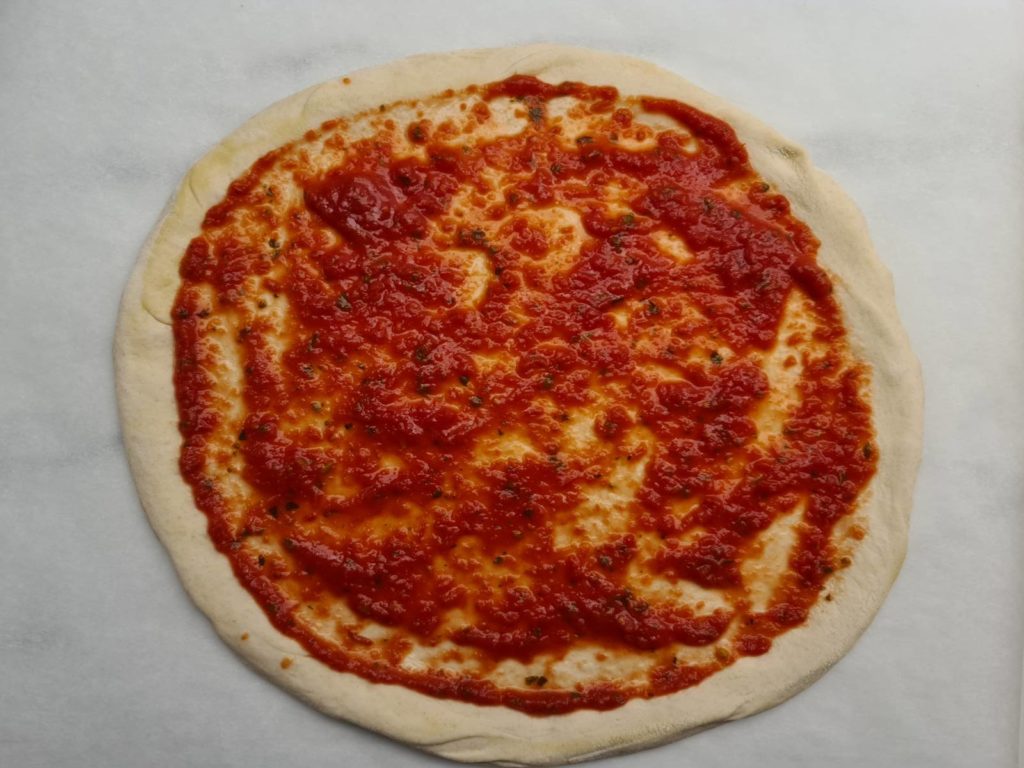
7. Topping the pizza (garnishing)
Time for the fun part! You can top your pizza with whatever you like. Be experimental and have some fun. But don’t add too much, because then it will take longer to bake the pizza, and you’ll end up with a dry crust.
The way you top a pizza is first sauces, then cheese, and lastly toppings.
- Sauces
- Cheese
- Toppings
7.1 Sauce
You can use any sauce you like. I will not cover sauce in this recipe, as it’s mainly about the dough. But you can check out an easy Neapolitan pizza sauce you can make in less than 5 minutes here.
Simply spread 2-3 large spoons of sauce (80-100g) evenly throughout the pizza base.
7.2 Cheese
Next, add cheese. Mozzarella is a great choice!
7.3 Toppings
Lastly, add toppings. Spread the toppings of your choice evenly across the pizza.
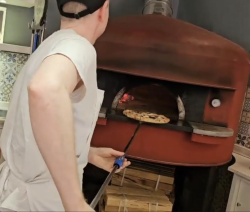
8. Baking
8.1 Preheating
Place your pizza stone or pizza or
8.2 Move the pizza
Grab your
You don’t want to leave the pizza on the peel for too long since it will stick to the peel.
8.2 Bakeing the pizza
Let the pizza bake for 8-10 minutes until the cheese has melted and the crust is starting to brown slightly. If it bakes unevenly, turn the pizza using your
Why pizza should be baked in a hot oven
A quick and fast bake is what defines Neapolitan pizza, and what makes it stand out.
When you bake your pizza in a really hot oven, the rim of the pizza will puff up (oven spring) and create a beautiful, light, and airy crust. A quick bake also allows the crust to crisp up without drying it out, leaving a soft and delicious interior. Even though we can’t get our home ovens as hot as a wood-fired
Baking multiple pizzas
If you’re baking many pizzas in a row, the temperature of your pizza stone or steel will drop. So you need to let it reheat after a few pizzas so that all the pizzas come out nice and crispy.
- Neapolitan Pizza Dough Planner - June 7, 2026
- Is Your Pizza Dough Too Dry? Here is How to fix it! - June 10, 2024
- The Ultimate Guide to the Pizza Dough Windowpane Test - June 8, 2024
It turned out better than expected great pizza dough the best thank you
Can you freeze some of the pizza balls for later use, and if so, at what point do you freeze them? After the 2 hour rise or after the 6 hour rise?
thank you!
Both will work, but I usually let the dough balls fully ferment (6 hours) before freezing.
Hi
Can you make the dough and store for a number of day? How do you store it with out to much ball fermentation.
How do you store it? How many days can it be stored for?
Thanks Amy
Hi, you can store it in the fridge a couple of days, or freeze it.
Have a look at this article for more information: https://thepizzaheaven.com/how-to-store-pizza-dough/
Hi , can yoh use this dough recipe for wood fire oven? If not which would you suggest?
Thank you
Yes, absolutely!
I have seen the dry yeast amount from 1% to .1%. why the large difference?
The amount of yeast in pizza dough depends mainly on two things: time and temperature.
The more yeast you add yo your dough, the quicker it will rise. And lower the temperature, the more yeast you need to add for the dough to rise in the same amount of time. So a 24-hour dough at 75°F/24°C requires at little as 0.1%, while 12-hour dough at 68°F/20°C requires closer to 1%.