Gluten is possibly the most important thing in pizza dough. This magical process is what turns flour and water into delicious bread. If you understand how gluten works, how it affects the dough, and how to manipulate it you can make the perfect pizza dough, exactly as you want it!
What Is Gluten?
Gluten is a collection of proteins found in wheat flour that makes the dough elastic and able to hold its shape. When these proteins absorb water they start to form a network that makes the dough keep its shape. This network will grow stronger and tighter during kneading, making an extensible and elastic dough. Gluten is also what creates pickets of trapped gas inside the dough, and what allows it to puff in the oven.
How Gluten Affects the Pizza Dough
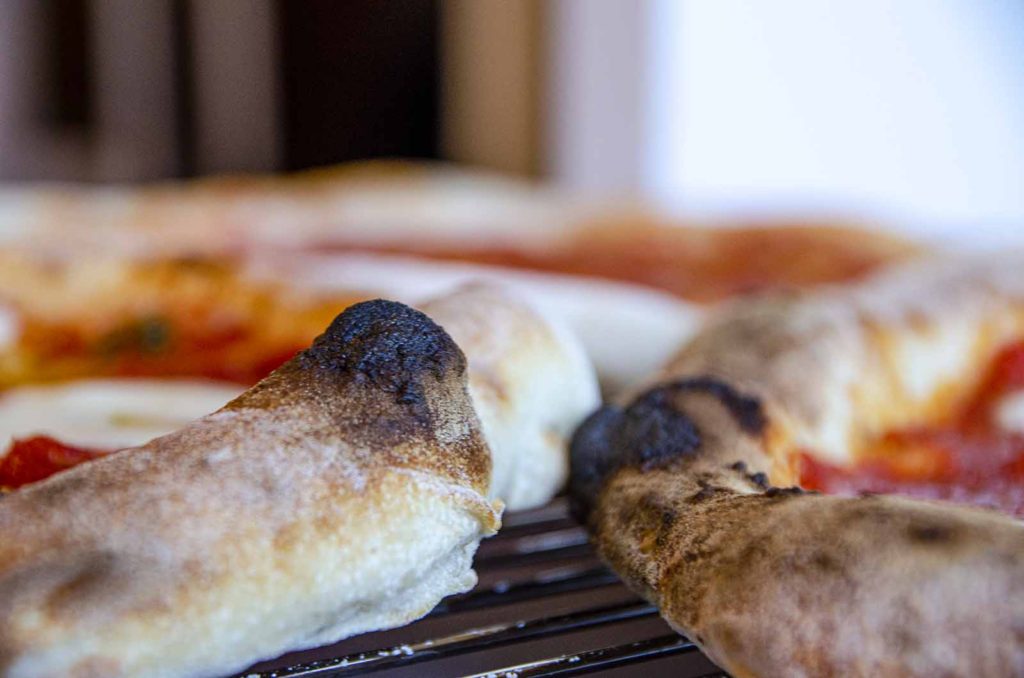
Gluten development in the dough affects a variety of different properties in the dough and finished pizza. It’s what gives the dough structure and allows it to keep its shape for a long or short time. It’s also what determines how stretchy the dough is. It also determines if it will tear when you shape the pizza or not. Gluten also affects how crispy the crust will get, in addition to the oven spring (how much it puffs up), and how large the bubbles in the crust will be.
To fully be able to control your pizza, you, therefore, need to understand how gluten works. This will also help you fix your dough, and adjust it to get just the dough you’re looking for.
The Amount of Gluten in the Flour is Important
In order to get any gluten development in your dough, you have to use flour that contains gluten proteins. The amount of gluten development you can get depends on how much gluten the flour contains.
A low-protein flour will make a dough with less structure, that can’t hold its shape over time. It will be hard to stretch the dough and shape the pizza because the gluten network is not strong enough. A low-gluten dough will, however, create larger air bubbles. The reason is that it creates a looser gluten network, thus will stretch more.
A high gluten content, on the other hand, will make a tighter and stronger gluten network. This, in turn, will make smaller air bubbles, simply because the “walls” of these air pockets are so strong.
Kneading to Develop Gluten
The most common way to develop gluten is through kneading. The gluten has to first be hydrated (more on that in the next section), meaning you need to mix water with the flour for the gluten to activate and start to develop the network.
You can look at kneading as forcefully mixing the water with the gluten to make it develop. The main benefit of kneading is that you introduce air pockets to the dough, and distribute them evenly throughout the dough. These bobbles are what allow the crust to puff up in the oven and make a nice cornicione (raised Neapolitan pizza crust).
The dough will start out a bit wet and sticky (depending on how much water it contains) when you start kneading. But when the gluten starts to develop it will transform, and turn firm and smooth as you keep kneading. So don’t worry if you think your dough is too sticky, just keep kneading!
Dough Hydration
Water is what activates the gluten and starts the gluten development process.
By adjusting the hydration of the dough you will also adjust the gluten structure. Dough hydration is simply the amount of water compared to the amount of flour in the dough. This is measured in percentages, such as 60% hydration. You can read everything about baker’s percentages and pizza dough hydration here.
When you increase the hydration, it will soften the gluten strands that make up the gluten network. This allows it to stretch thinner, and will therefore create larger air bubbles. Thinner gluten strands will also get crispier during baking. So if you want a crispier crust with larger air bubbles and a better oven spring, you should add more water to your dough.
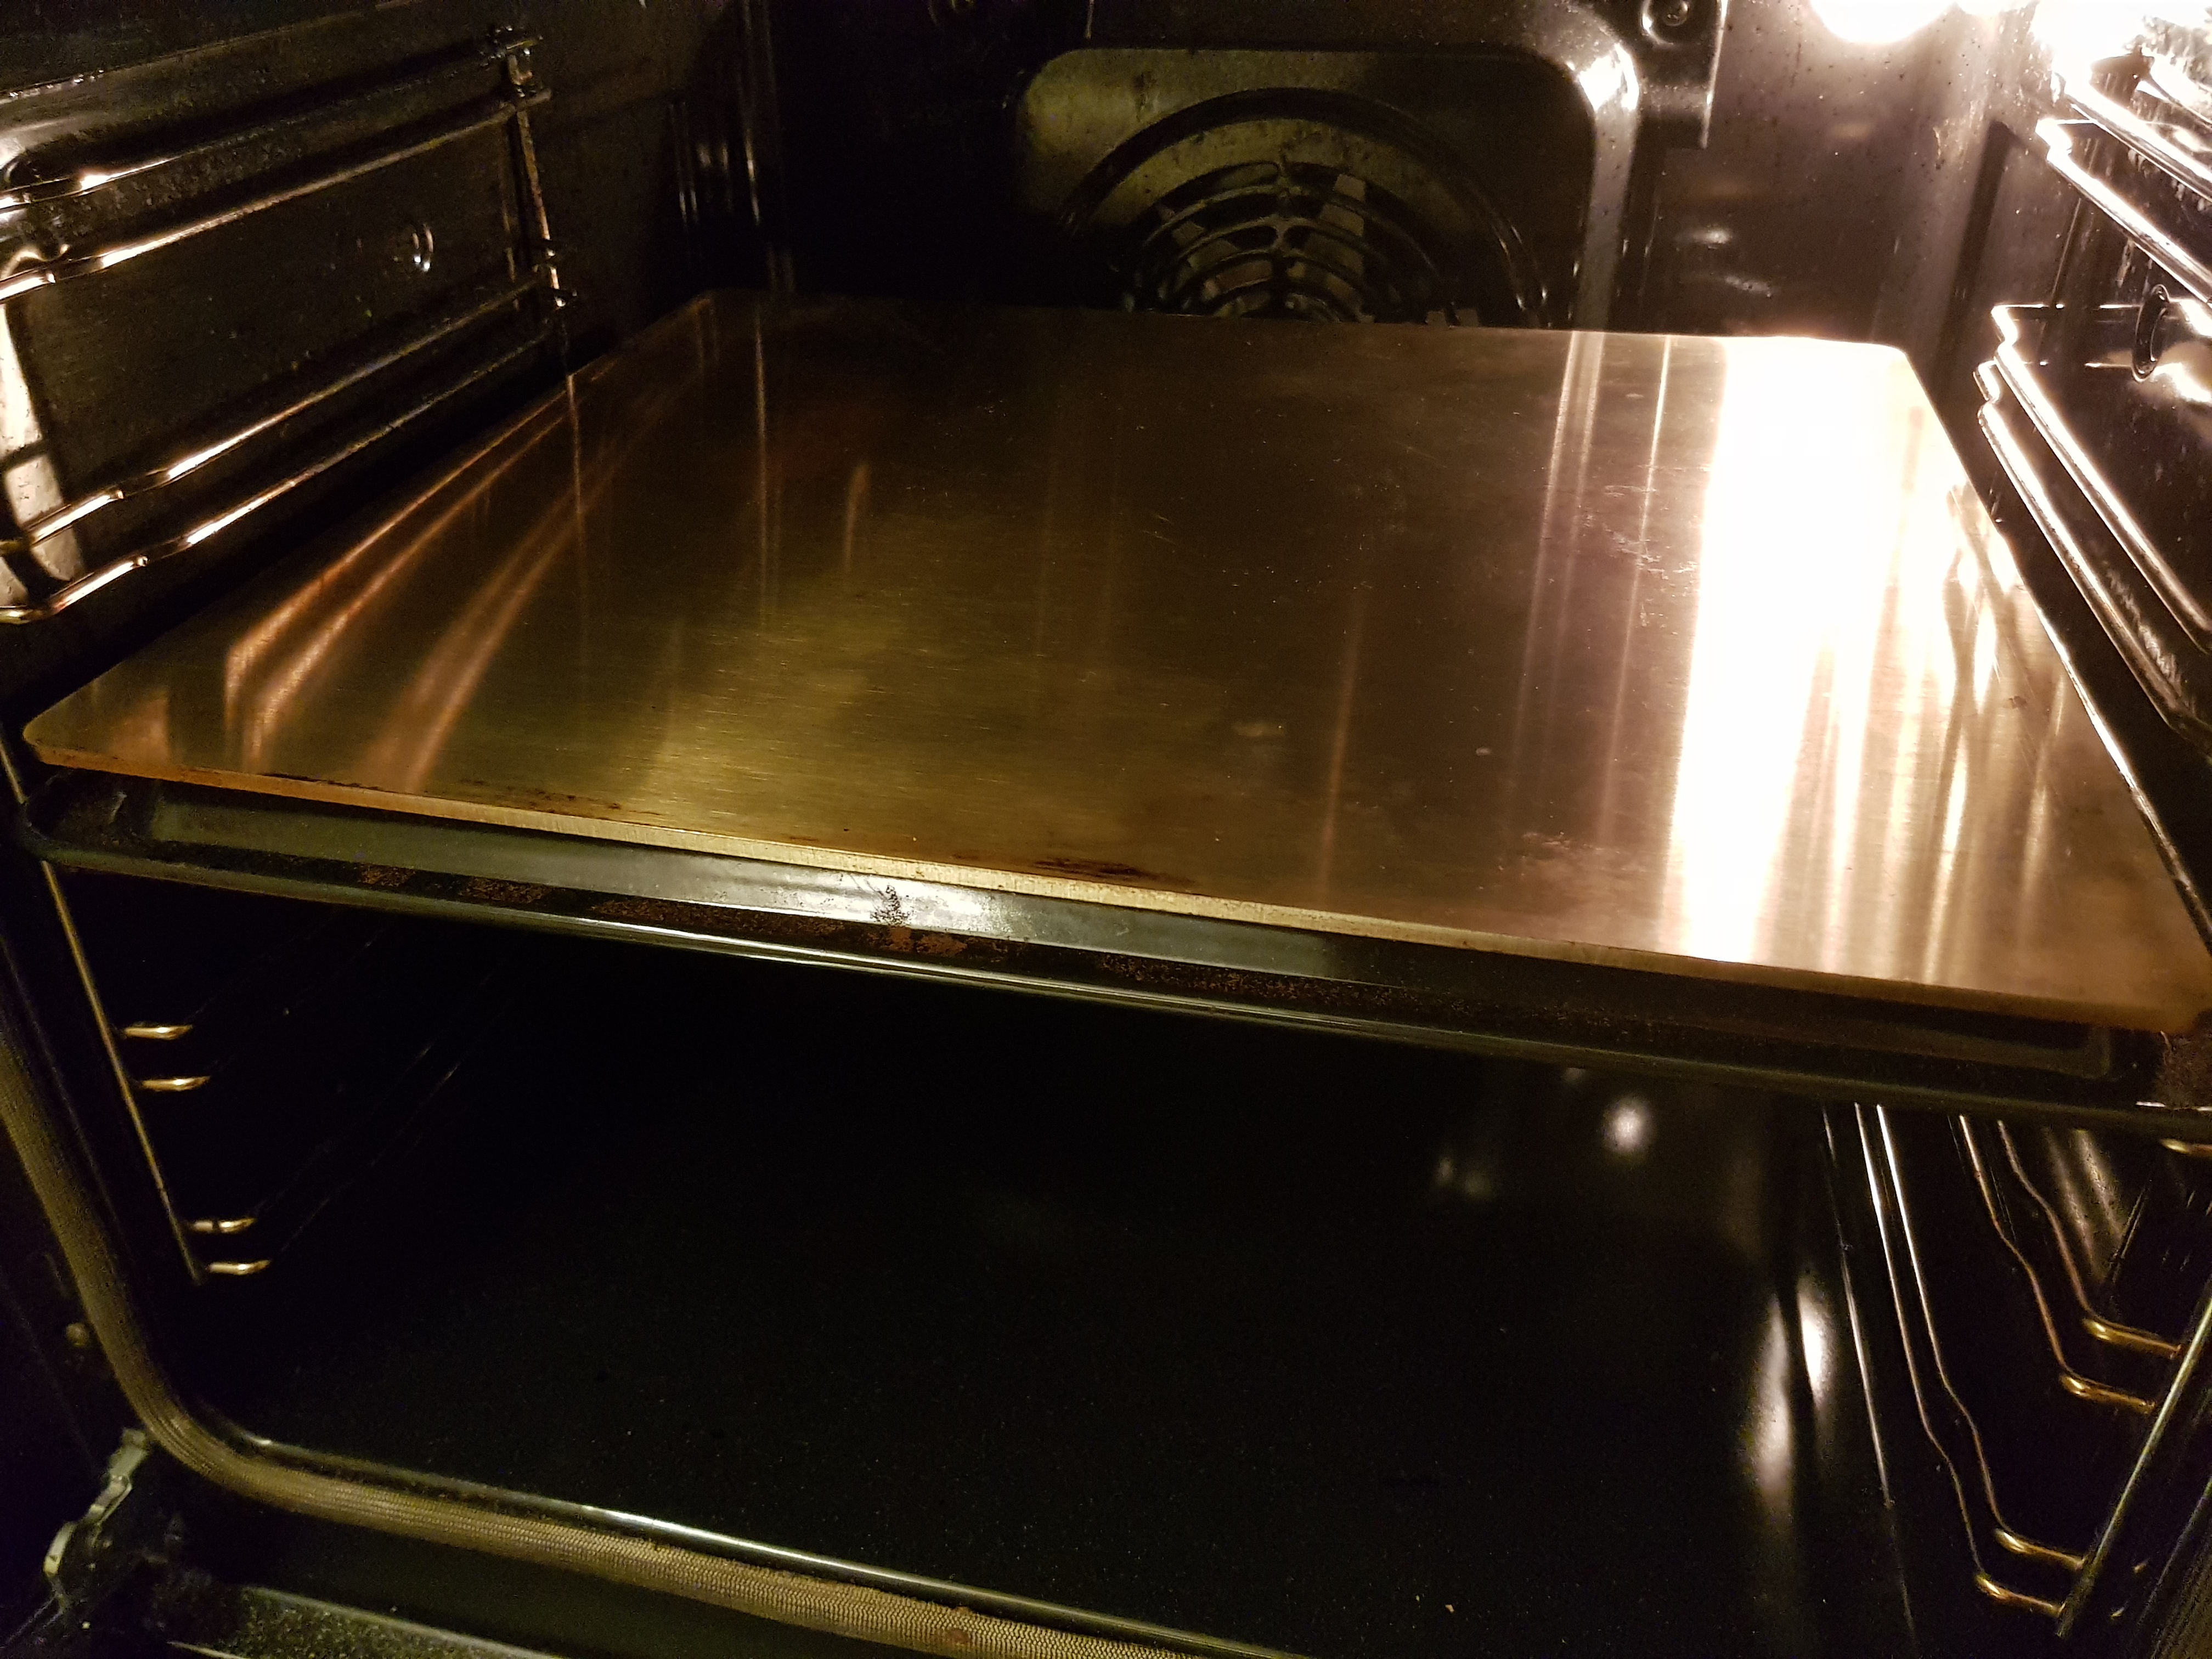
Here’s an image of a pizza made with 70% hydration:
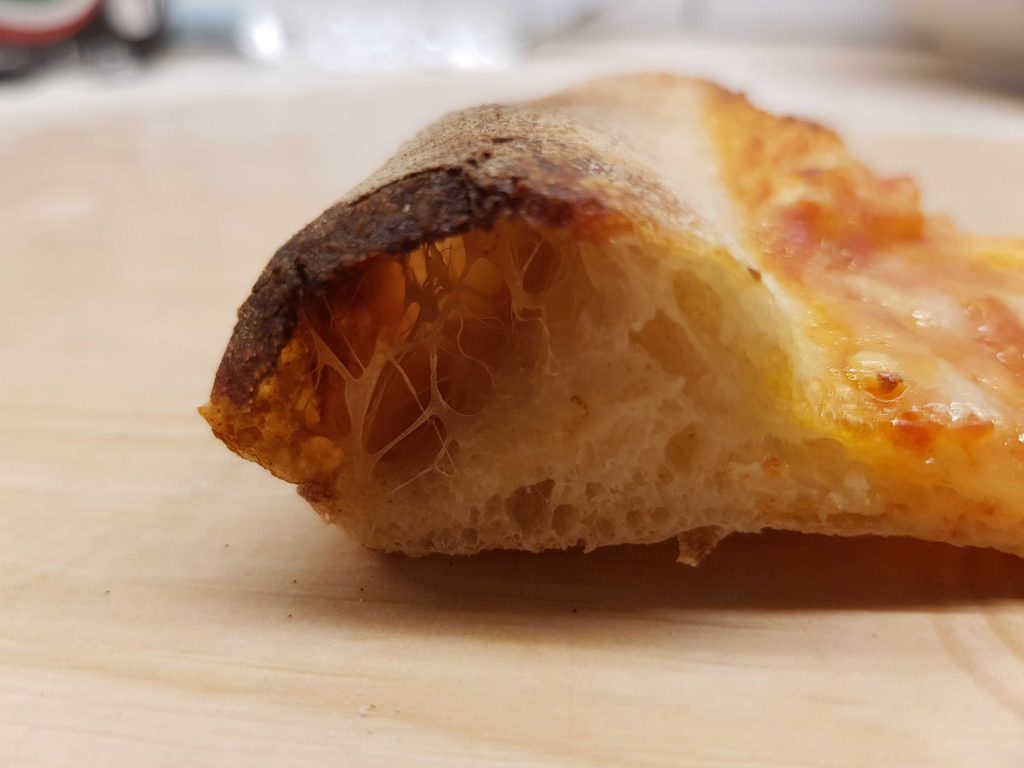
As you can see, the crust puffed up nicely in the oven and ended up with large air pockets inside the crust.
If you decrease hydration, you’ll get the opposite effect. Tougher gluten strands result in smaller air bubbles because the dough isn’t able to expand as easily.
Autolyse
Another way to develop gluten, in addition to kneading, is by using a method called autolyse. Autolyse is a baking technique where you mix the ingredients, but before you start kneading the dough, you let it rest for 15-30 minutes. This short rest will give the gluten enough time to fully hydrate before you start kneading. When the gluten hydrates, it will start to develop. At the same time, the amylase enzymes start turning starch into sugars and give the yeast a headstart.
By introducing an autolyse step, you will also reduce the kneading time because the gluten already has got time to hydrate and start developing the gluten network.
Gluten Development in No-Knead Pizza Doughs
It’s also possible to make no-knead pizza dough, simply by using autolyse, then stretching and folding the dough occasionally. This will create a looser gluten structure, which gives the dough large air bubbles. This method is often used to make Pizza Al Taglio, large square-shaped pizzas sold by weight in Rome.
Making a no-knead pizza dough requires more time from start to finish, but less active work. All you need to do is mix the dough and give it 15-30 minutes to rest. Then, every 10-15 minutes, simply grab the corners, one by one, stretch them, and fold them back onto the dough. (A round pizza dough doesn’t technically have corners, but just imagine it has four corners)
Let the Dough Rest If the Gluten Get Too Tight
When you work with high-gluten dough, you might experience that the dough gets hard and hard to stretch. This probably means the gluten is too tight. This typically happens when you work the dough. You will therefore experience this right after kneading or balling (creating individual pizza balls from a larger dough).
The gluten strands also tighten when they’re exposed to low temperatures. It’s therefore important to let the dough be at room temperature when you stretch and shape your pizza. Otherwise, the dough will just spring back. This is particularly important for cold fermented pizza dough, give the dough at least 2-3 hours at room temperature if you’ve stored it in the fridge.
To solve this, just let the dough rest, and the gluten will relax. This will give you a more pliable dough that’s easier to work with.
I sometimes give the dough a few minutes of rest in the middle of kneading too. This makes the dough softer and easier to knead.
Check for Gluten Development
The two most common ways to check if the dough gluten has developed enough are The Poke Test and The Windowpane Test.
Before you perform any of these tests, I recommend letting the dough rest for a few minutes for the gluten to relax a bit.
The Poke Test
To perform The Poke Test, simply poke the dough with your index finger, and see if it springs back. If it does, this means that gluten has developed enough, and is strong enough to keep the shape of the dough.
The Windowpane Test
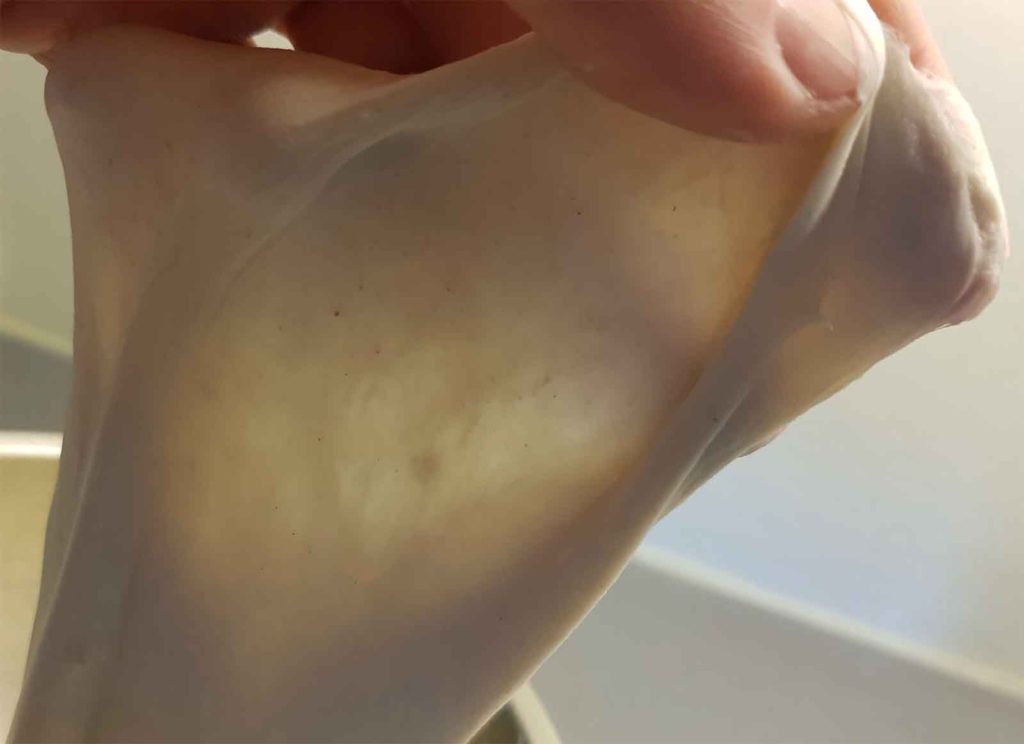
The other way to check if the gluten has developed enough is The Windowpane Test. Take a small piece of dough, and carefully stretch it out as thin as possible. The dough should get paper-thin without ripping or tearing, and the test is passed if you can stretch it out so thin that shines through eh dough. This is an indication the gluten is strong enough.
If the dough tears before it gets thick enough, you need to knead the dough more.
How to Pick the Right Flor for Your Dough
Picking the right flour will hugely impact the dough since the gluten content varies a lot. Exactly what flour you need depends on what kind of dough you want to make. Most recipes tell to use all-purpose flour, others bread flour, but none of them is the best choice for proper pizza dough.
All-purpose is okay if you’re making 1-2 hours, of short-rise dough, but to make good pizza, you need longer fermentation times. All-purpose usually has a gluten content of 10%, which creates a gluten network that’s too weak to withstand longer fermentation times. Another disadvantage of weak gluten development is that the dough will rip easily when you try to stretch out the pizza.
Bread flour, on the other hand, is a strong flour with a gluten content of 13-14%. This is a bit too much for pizza. It will hold up longer fermentation times well, but the gluten network will get so strong that the dough will keep springing back, making it hard to stretch out and shape the pizza.
You’re therefore looking for something in the middle, with a gluten content of 11-12%, like Italian Tipo 0 or Tipo 00 flour.
The Ideal Gluten Content In Pizza Flour
Tipo 0 and Tipo 00 flours are Italian milled soft wheat flours. The numbers (“0” and “00”) indicate how fine the flour is on the Italian flour scale. Tipo 00 is finer ground and contains the least amount of brand and wheat middlings. Both Tipo 0 and 00 are great for pizza baking and come in the 10-12% gluten range. It’s also the only two types of flour approved by the AVPN for true Neapolitan pizza.
But even if the flour is labeled “Tipo 0” or “Tipo 00”, it doesn’t mean they all are equally suitable for pizza making. Different flour in each category can hugely vary in gluten content, strength, etc.
The Best Flours Pizza Baking
My go-to when I’m baking Italian pizza is flour from Antimo Caputo. This is a Naples-based flour mill that has made flour for the local pizzerias for generations. They are also an approved supplier by the AVPN (The True Neapolitan Pizza Association), so if you want to make proper Neapolitan-style pizza, Antimo Caputo is definitely the day to go!
They have a variety of different flours, but my favorite is Caputo Pizzeria, which is intended for professional pizza makers. Caputo Pizzeria is on the stronger side and is therefore perfect for long-rise doughs.

Another option if you’re looking for stronger flour is Caputo Chef’s Flour (affiliate link). Caputo Chef’s flour is ideal for extra-long fermentation of 48 hours or more. I like to have a bag of that lying around for my cold-fermented pizza dough.
I’ve also written an article on Caputo Typo 00 Flours if you want to know more.
Can You Make Pizza Dough Without Gluten?
Yes, you can make pizza dough using gluten-free pizza flour, but you have to handle the dough a bit differently. If you bake pizza with gluten-free flour, you will not get dough with the same kind of structure. The main challenge is to stretch the dough since it will get very soft, and easily rip. You, therefore, can’t stretch gluten-free pizza dough, but rather have to press it into the right shape.

How to Get the Right Dough
This section will summarize information from this article to solve specific problems, in addition to linking to other relevant information about the specific problems.
How to Get a Stretchier Dough That Doesn’t Tear
The most important factor in a stretchy dough that doesn’t tear is to use a high-protein flour and to develop that gluten enough.
A good choice for flour is Caputo Pizzeria.
To develop the gluten, make sure to hydrate the flour properly, and knead the dough. Higher hydration will make the dough more stretchy, but a good starting point is 65% hydration. It’s also a good idea to use The Windowpane Test to ensure the gluten has developed enough.
I recommend to check out the articles Why Pizza Dough Tears When Stretching and How to Make Stretchy Pizza Dough.
Make the Dough More Pliable
If your dough is hard to stretch the reason is most likely either that the gluten is too tight or that you’re making a low-hydration dough.
Letting the dough rest for 10-15 minutes will relax the gluten and make the dough more pliable and easier to work with. Gluten is also tight if it’s cold. So if you cold-ferment your dough, leave it at room temperature for 2-3 hours.
I recommend starting at around 65% hydration. Anything below 60% will be hard to work with, in my opinion. And when you start to get to 70% and above, the dough will get sticky, which also can be challenging.
How to Get Larger Air Bubbles
To get larger bubbles in the crust, the glutens have to be soft. You can do that by using a high-hydration dough (65% or more), using the no-knead method, or using a lower gluten flour (10-11%).
How to Get Smaller Air Bubbler
For smaller air bubbles, you want to do the opposite. You need string gluten development. To achieve this, use strong flour (12% gluten), knead the dough well to fully develop the gluten, and use lower hydration (60% or less).
How to Give the Dough Better Oven Spring
Oven spring is created by high hydration and high baking temperature.
Hot to Make the Curst Crispier
The key to a crispy pizza crust is thinner gluten strands. The most important factor is high hydration, but you can also use the no-knead method.
Increasing the hydration to make the crust crispier may seem counterintuitive, but it works because the thing gluten strands bake faster, and gets crispier than thicker, stronger gluten strands.
Exact hydration depends on how fast you can bake your pizza. In short, the hotter and faster you can bake the pizza, the lower the hydration should be. A wood-fired
Related


- Neapolitan Pizza Dough Planner - June 7, 2026
- Is Your Pizza Dough Too Dry? Here is How to fix it! - June 10, 2024
- The Ultimate Guide to the Pizza Dough Windowpane Test - June 8, 2024
Great explanation! I think I kinda understand how gluten works now. It has been sort of a mystery to me. Thank you for the detailed article!
Sophia
I’m happy to hear that, Sophia!
I’m happy to hear that!
Great article!
Excellent article so well explained the mystery of gluten development. Enables me to tweak my hydration, use of flour types, bulking time and temperature and baking time and temperature. Makes baking dough sooo much more intriguing and interesting. A never ending learning experience.
Hi 👋🏼 I’m making Neapolitan pizza dough with polish for the 4th time. Although great tasting I however am learning something new every time in the proofing process. I’ve had the over fermented lesson learned right off the bat 🤦🏻♀️ Bringing me to a question regarding cold proofing. Here are my usual steps 1st make poolish 16 to 24 hours before 2nd step adding flour salt and water kneading and first rise. 3rd step making dough balls. I get stuck on 3rd step on when to put in fridge and can it be for 24+ hours. Can dough balls go in fridge immediately upon making. I have done 2 ways 1 went in fridge upon making dough ball and one went in fridge after letting it rise for two hours at room temperature this batch of dough was experimental I sacrificed flour (caputo pizzaria) to learn and I found that going straight to fridge and taking out 24 hours later yielded me the best dough ball and structure that I really liked working with the batch that went in the fridge after rising for two hours just went flat 24 hours later I’m wondering if I did something wrong with second dough ball? I did not cook them (Ooni Karu) for I was experimenting with them. I have watched so many videos that say yes you can go straight to fridge and some say no let rise at room temperature then go to fridge. I have a birthday coming up and would like to make pizza again knowing they will good straight to fridge method. I have picture of my process 24 hours later I wish I could show you my experiment.
Hi, experimenting is always interesting! It’s hard to say if something went wrong with the second dough ball without seeing it. But it’s normal that the dough spreads out when you leave it to ferment for 24 hours or more. And the dough can turn out perfect even if it seems flat. I haven’t done the exact experiment you have. But a few thoughts.
When it comes to fermentation, there are different processes happening simultaneously. At room temperature, you have active yeast that produces CO2 and inflates the dough and make it rise. As you lower the temperature, this process will slow down, while other fermentation processes will continue. So even at low temperatures, where the yeast is completely inactive, other fermetnation processes will continue to mature the dough and develop flavor. And flavor development at low temperatures will be different from flavor development at room temperature. So it’s a question of taste. But if your fridge is too cold, that the yeast becomes inactive, it might not increase in volume, and give you a denser pizza crust. That’s where a room temperature rise before cold fermentation makes sense.
Good job am learning alot from you
Andreas, just wanted to let you know how much I have learned from you how to make Neapolitan pizza. Your web site is a veritable Encyclopedia of pizza making and it’s incredible how much thorough material you cover.
Thanks for your dedication, excellent material and your hard work to share your pizza knowledge.