Ever wondered how to tell if your pizza dough is ready? The secret lies in a simple yet powerful technique known as the pizza dough windowpane test. This simple test can be the difference between a mediocre pizza and one with the perfect, airy, and chewy crust that everyone loves.
In this post, you’ll learn how the windowpane test can help you achieve baking the perfect pizza. We’ll explain what the windowpane test is, why it matters, and provide a step-by-step guide on how to perform it.
What is the Windowpane Test?
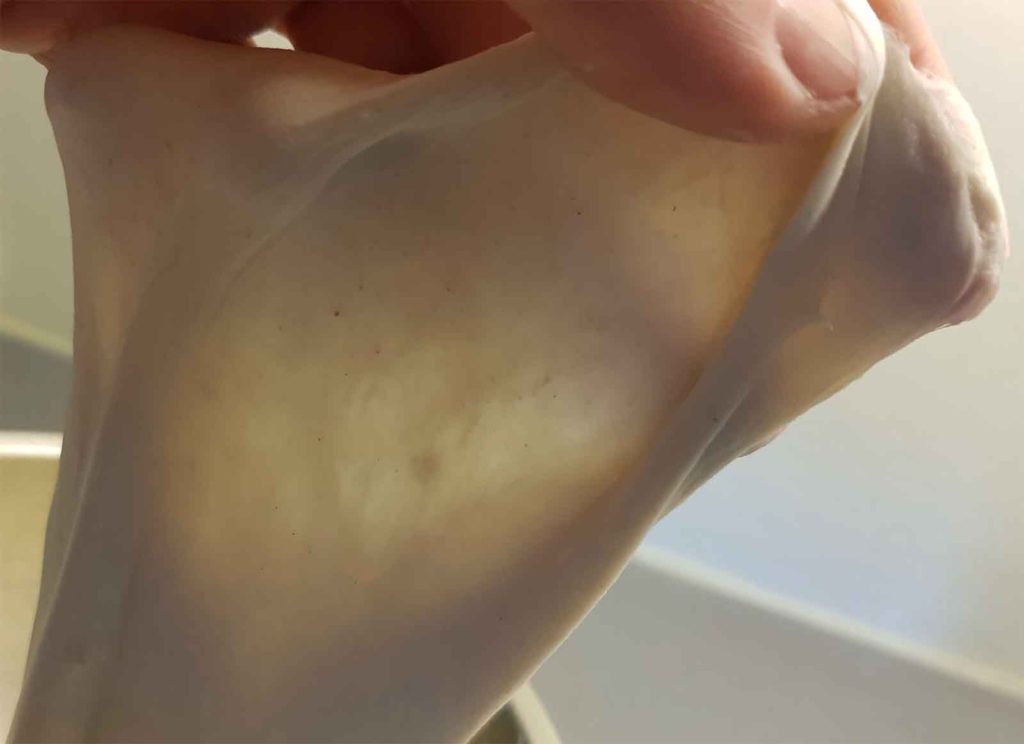
The windowpane test (or window pane test) is a simple yet effective method you can use to assess the gluten development and elasticity of your pizza or bread dough.
By gently stretching a small piece of dough, you can determine if it has been kneaded sufficiently. If the dough stretches thin enough to become translucent without tearing, it has passed the test and is ready for the next steps in your pizza-making recipe and process.
Achieving the perfect pizza crust relies heavily on the quality of your dough. The windowpane test is crucial because it directly relates to the dough’s ability to rise properly and hold gas bubbles during fermentation. Well-developed gluten creates a strong and elastic dough, which is essential for a pizza crust that is airy and chewy. By performing the windowpane test, you ensure your dough is on the right track to becoming the perfect base for your pizza.
How to Perform the Windowpane Test for Your Pizza Dough
Step-by-Step Guide
- Prepare a Small Dough Ball: Take a small piece of your regular dough, about the size of a golf ball, and gently shape it into a ball.
- Let It Rest: Allow the dough ball to rest for a few minutes. This makes it easier to stretch and prevents tearing.
- Begin Stretching: Hold the dough ball between your thumbs and index fingers. Gently start to stretch the dough outward, rotating it as you go to create an even, thin layer.
- Check for Translucency: Keep stretching until the dough becomes thin enough to see light through it without tearing. If it stretches without breaking, your dough has passed the windowpane test.
- If It Tears: If the dough rips before becoming translucent, it needs more kneading. Return the dough to the mixer or continue kneading by hand, then repeat the test.
When to Use the Windowpane Test for Pizza Dough
Performing the windowpane test at the right time is crucial for accurate results. Here are the best times during the dough-making process to perform the test:
- After Initial Kneading: The first optimal time to perform the windowpane test is after you have kneaded the dough for the initial recommended time. This will help you determine if the dough has reached the desired gluten development.
- Before Final Proofing: Another good time to perform the test is after bulk ferment, just before the final proofing stage. This ensures that the dough is elastic and well-developed, ready to rise properly during the final fermentation.
The Importance of Letting the Dough Rest
Letting your dough rest before performing the windowpane test is vital. Resting allows the gluten strands to relax and become more extensible, making the dough easier to stretch without tearing.
- Relaxation of Gluten: After kneading, gluten strands are tight and can resist stretching. A short rest period allows these strands to relax, making the dough more pliable.
- Easier Handling: Resting the dough makes it less sticky and easier to handle, which is crucial for successfully performing the windowpane test.
To summarize, aim to perform the windowpane test after initial kneading and before final proofing, always ensuring the dough has had a chance to rest. This approach will give you the most accurate indication of your dough’s readiness.
Does Pizza Dough Need to Pass the Windowpane Test?
While the windowpane test is a useful tool for assessing dough quality, it’s not always necessary for every type of pizza dough.
The windowpane test is a tool to evaluate how much the gluten has developed. But you don’t need to fully develop the gluten structure during kneading. The level of gluten development depends on what type of crust structure you want and the fermentation time, since the gluten will develop over time.
Different Fermentation Times
- Short Fermentation: For doughs that are fermented for a shorter period (less than 24 hours), passing the windowpane test is more critical. These doughs rely on thorough kneading to develop gluten strength and elasticity quickly.
- Long Fermentation: For doughs that undergo long fermentation (24 hours or more), passing the windowpane test is less critical. Over time, gluten continues to develop naturally during the extended fermentation process, which can compensate for less initial kneading.
Type of Pizza Crust
- Thin Crust Pizzas: If you’re aiming for a thin, crispy pizza crust, ensuring your dough passes the windowpane test can be more important. The strong gluten network helps the dough stretch thinly without tearing.
- Thicker Crusts: For thicker crusts or pan pizzas, the windowpane test is less essential. These doughs benefit from a stronger structure but do not require the same level of elasticity and thinness as a for example Neapolitan pizza.
Why Your Pizza Dough May Not Pass the Windowpane Test
If your dough doesn’t pass the windowpane test, there are several common reasons why this might be happening:
1. Not Enough Rest Time
If you don’t give the dough enough time to rest before attempting the windowpane test, the gluten strands may still be too tight and resistant to stretching.
2. Low-Protein Flour
Using a low-protein flour, such as all-purpose flour (AP flour), can result in insufficient gluten development. Opt for pizza flour or bread flour for better results.
3. Too Much Flour
Adding too much flour to the dough can make it too dry and crumbly, preventing it from stretching properly.
4. Insufficient Kneading
Not kneading the dough enough results in a weak and non-stretchy dough. Ensure you knead the dough thoroughly to develop a strong gluten network.
5. Over-Hydration
Over-hydrating the dough makes it too sticky and wet, which can make it difficult to handle and stretch.
Kneading Pizza Dough
Kneading is crucial for developing gluten, the protein network that gives pizza dough its structure, texture, and elasticity. Proper kneading ensures your dough can stretch thinly without tearing and rise well during fermentation, resulting in a light, airy, and chewy crust.
Techniques for Kneading
There are several methods you can use to knead pizza dough, whether you prefer to do it by hand or with a mixer. Here are some effective techniques:
Kneading by hand
- Traditional Kneading: Push the dough away from you with the heel of your hand, fold it back over itself, rotate it, and repeat. Continue this process for 10-15 minutes until the dough is smooth and elastic.
- Stretch and Fold: Stretch the dough out, fold it over itself, rotate it 90 degrees, and repeat. This method is less strenuous and can be done in intervals during the dough’s resting period.
Using a Mixer
- Stand Mixer with Dough Hook: Attach the dough hook to your stand mixer and knead the dough on a low speed for 8-10 minutes. The dough should pull away from the sides of the bowl and form a cohesive ball.
- Spiral Mixer: Spiral mixers are highly efficient for kneading dough. They use a spiral-shaped hook that rotates within the bowl, providing a more intensive mix, thorough, and even kneading process. These mixers are particularly useful for handling larger batches of dough and achieving consistent results.
- Check Consistency: Stop the mixer occasionally to check the dough’s consistency. It should be smooth, elastic, and slightly tacky but not overly sticky.
Tips for Effective Kneading
- Consistency: Ensure the dough is neither too dry nor too wet. Adjust with small amounts of water or flour as needed.
- Resting Periods: Allow the dough to rest intermittently during kneading. This helps relax the gluten and makes the dough easier to handle.
- Visual and Tactile Cues: Pay attention to how the dough looks and feels. It should become progressively smoother and more elastic as you knead.
The Pizza Dough Windowpane Test When for Whole-Grain Flour
Whole grain wheat flours absorb more water and have bran and germ that interfere with gluten formation, making the dough denser. To improve gluten development, increase hydration (the amount of water compared to flour) and consider mixing in high-protein bread flour.
Whole-grain pizza doughs may need longer kneading and extended fermentation times to pass the windowpane test. Start by substituting a small portion of white flour and gradually increase. Employing the autolyse method, where you mix flour and water and let it sit for 20-30 minutes before adding salt and yeast, can also help. These adjustments will help your whole-grain dough achieve enough gluten gluten development for a successful windowpane test.
Conclusion
Mastering the pizza dough windowpane test ensures your dough has the right gluten structure for a perfect, airy, and chewy crust. By understanding when and how to use the test, and addressing common issues, you can improve your pizza making process.
Remember, while the windowpane test is a helpful indicator, it’s not the only factor in making great pizza dough. Experiment with different flours, kneading techniques, and fermentation times to find what works best for you. Practice and refine your technique, and feel free to share your experiences and questions in the comments. Happy pizza and start making pizza dough!
- Is Your Pizza Dough Too Dry? Here is How to fix it! - June 10, 2024
- The Ultimate Guide to the Pizza Dough Windowpane Test - June 8, 2024
- The Ultimate Guide to Autolyse Pizza Dough - June 7, 2024